Code for units
Jump to:
Set object position N/S/E/W + height
Set object orientation
Attach objects and set orientation
Detach objects with addaction
Create loadout
Move units into vehicles
Teleportation
Change unit texture
Set damage to map object
Remove or change position of map building
Create fire
Modify player, AI and object damage
Animal class names
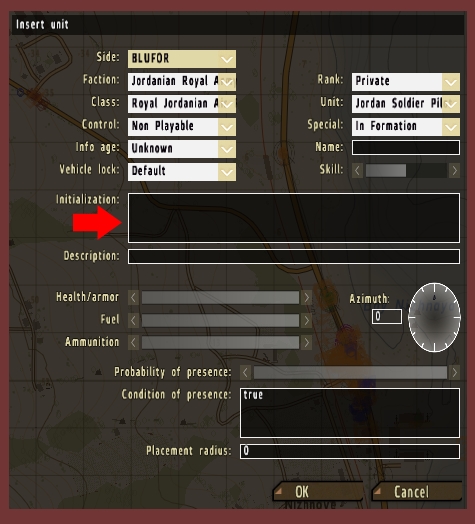
All of the code snippets will be placed in the 'Initialization' field of the unit, as seen in the image below:
One issue to be aware of is that the 'Initialization' field gets cleared out upon respawn, so a player will lose everything at that point. One way to counteract this is to create a player-init.sqf file and place it into your mission folder. Place all of your code into the player-init.sqf file, as in this example:
_unit = _this select 0;
_unit addEventHandler ["HandleDamage", {((_this select 2)/1.3)}];
_unit setFace "face01_camo6";
_unit addEventHandler ["killed", {playMusic "death01";}];
Then place these two pieces of code in the 'Initialization' field of your player:
null = [this] execVM "player-init.sqf";
this addeventhandler ["respawn","_this execVM 'player-init.sqf'"];
There are some subtle modifications to each piece of code that need to be made:
THIS
this addEventHandler ["HandleDamage", {((_this select 2)/1.3)}];
IS THE SAME AS THIS
_unit addEventHandler ["HandleDamage", {((_this select 2)/1.3)}];
The first one is used if you plan to place all the code directly into the player 'Initialization' field. The second is used if all code is entered into the player-init.sqf file and then called from the player 'Initialization' field.
Set object position N/S/E/W plus height
this setPos [ (getPos this select 0) +2, (getPos this select 1) +4, (getPos this select 2) + 6]
'Select 0' is the East/West axis, 'Select 1' is the North/South axis and 'Select 2' is the Height.
Change the numbers at the end of the code (2, 4 ,6) to adjust the parameters. Numbers can be positive or negative (or combination thereof) and do not need to be whole numbers (0.3, 0.5, 1.7, etc).
(back to top)
Set object orientation
this setVectorup [0,0,0.1];
The above code will set any object on a level plane, overriding any terrain altitude changes beneath the object (i.e. hills and such). Modifying any of the three numbers will change the orientation on the X, Y and Z axes (Cartesian coordinate system).
It can sometimes take a bit of fiddling to get the desired orientation as adjusting one axis will influence all other axes.
(back to top)
Attach objects and set orientation
In this example we will attach a barrel oriented on its side to the left front side of an M1A1 tank. Give the tank a name (EX: 'tank01') and enter this code in the barrel's 'Initialization' field:
this attachTo[tank01,[-1.5,2,-0.8]]; this setVectorup [-10,-360,0];
The first part of the code (-1.5,2,-0.8) is the location of the barrel on the tank. The second part of the code (-10,-360,0) is its orientation. In this case the barrel has been flipped right 90 degrees and then flipped forward 90 degrees.
As you probably noticed, simply entering '90' and '90' in the X and Y coordinates will not give you the desired results so you will need to play around with the numbers.
(back to top)
Detach objects with addaction
In the previous example we attached a barrel to a tank. In this example we will detach the barrel so that it will drop to the ground. This scenario is useful in the case where you would like vehicles to transport items to locations for drop-off. Name the barrel 'barrel01' and place this code in its 'Initialization' field:
this addaction ["DETACH BARREL!", "detach-barrel.sqf"];
Utilizing the code from the previous example, the full entry should be this:
this addaction ["DETACH BARREL!", "detach-barrel.sqf"]; this attachTo[tank01,[-1.5,2,-0.8]]; this setVectorup [-10,-360,0];
Now create an .sqf file titled 'detach-barrel' and drop it into your mission folder. Place this code in the file:
Now players can scroll over the barrel and select the option to detach it from the tank.
(back to top)
Create loadout
removeAllWeapons this;
{this addMagazine "30Rnd_556x45_Stanag"} forEach [1,2,3,4];
{this addMagazine "17Rnd_9x19_glock17"} forEach [1,2,3];
{this addMagazine "HandGrenade_West"} forEach [1,2];
{this addMagazine "SmokeShellPurple"} forEach [1];
this addWeapon "Binocular";
this addWeapon "NVGoggles";
this addWeapon "ItemGPS";
this addWeapon "m16a4";
this addWeapon "glock17_EP1";
This removes all the previous weapons, adds four rifle magazines, three pistol clips, two hand grenades, one purple smokeshell, binoculars, nightvision goggles, a GPS, an M16A4 rifle and a G17 pistol.
There is a maximum capacity of twenty items. If you surpass that number everything will still show up in the editor but you will find part of your gear missing in multiplayer.
You can get all the weapon codes from the links below:
ArmA 2:OA and DLC Weapons
ArmA 2: Weapons
You can read 'ArmA 2 | Loadout Codes for Units' for more detailed instructions on creating loadouts, including using a loadout.sqf file.
(back to top)
Move units into vehicles
Give the vehicle a name (EX: 'hmmwv01') and then place the following script into the group leader's 'Initialization' field. Make sure to change the name to the actual name of the vehicle. Everyone who is part of the group will start in the vehicle.
{_x moveInCargo hmmwv01} forEach units group this;
You can also move individual units into specific vehicle locations. This code will move the player into the driver's seat:
this moveInDriver hmmwv01;
Depending on the vehicle this code will move a unit into either the front passenger seat gunner position or the turret position:
this moveInGunner hmmwv01;
To specify the turret position you will need to use this code:
this moveInTurret [hmmwv01,[0]];
Placing other units in unspecified empty seats can be done by placing this code in their 'Initialization' field:
this moveInCargo hmmwv01;
And finally, for the Commander's seat use:
this moveInCommander hmmwv01;
You can also unassign units with the following code, which will force them to exit the vehicle:
{unassignVehicle _x} foreach [unit01,unit02,unit03];
Make sure to change the names unit01, unit02 and unit03 to the correct names. This code is useful in a situation where you would like units to exit vehicles at specific times via a trigger timer.
(back to top)
Teleportation
Place a marker down on the teleportation destination point. Name it 'location01'. Place an empty object (signs work great) a distance away and enter this code in its 'Initialization' field:
this addAction ["Teleport","teleport.sqf",["location01"]];
Open your text editor and copy & paste this code into it:
_dest = (_this select 3) select 0;
_dir = random 359;
player SetPos [(getMarkerPos _dest select 0)-10*sin(_dir),(getMarkerPos _dest select 1)-10*cos(_dir)];
Save the file as teleport.sqf and drop it into your mission folder. Players can now scroll over the teleporter object and choose the option to teleport. This will move them to the marker location.
(back to top)
Change unit texture
This works bet for customizing signs. First, create your artwork in PhotoShop or other graphics software. Convert the image into a .paa file using 'TexView 2' which is part of the Bi tools 2.5 suite. Drop the image into your mission folder and then launch the editor.
Place down a sign (unit) and enter this code in its 'Initialization' field:
this setObjectTexture [0,"NAME-OF-IMAGE.paa"];
Your image will now be on the sign face/s. You can also re-texture vehicles which often require more than one texture, as in the case of the HMMWV:
this setObjectTexture [0,"pictures\NAME-OF-IMAGE.paa"]; this setObjectTexture [1,"pictures\NAME-OF-IMAGE.paa"]; this setObjectTexture [2,"pictures\NAME-OF-IMAGE.paa"];
You'll notice that, along with adding three textures to the vehicle, I created a 'pictures' folder to store images. You may want to consider doing this as you can gather quite a few images very quickly for use in your mission.
(back to top)
Set damage to map object
Select the map object you would like damaged (typically a building hard-coded into the map) and then click the 'IDs" button on the right sidebar. All of the id's will now display in tiny white boxes across your map.
Get the ID number for your object (let's say its an airport hangar with the ID of 17131) and then place down a 'Game Logic' unit on top of the building. Name the unit 'hangar01' and in its 'Initialization' field enter this code:
hangar01=position this nearestObject 17131; hangar01 setdamage 1;
Damage 1 will completely destroy the building, leaving a small pile of rubble. Damage 0.1 will create minimal damage. You may adjust as needed using that range.
If you are planning to do quite a bit of map modification then you should compile all your "destruction" into one .sqf file and call it from a single 'Game Logic'.
Place down a 'Game Logic' and name it 'destruction01'. Place this code in its 'Initialization' field:
null = [this] execVM "destruction.sqf";
Create an .sqf file titled 'destruction' and place it into your mission folder. Place this code in the file:
((position destruction01) nearestObject 00001) setDamage 1;
((position destruction01) nearestObject 00002) setDamage 1;
((position destruction01) nearestObject 00003) setDamage 1;
Replace the numbers 00001, 00002 and 00003 with ID numbers from your own map. Then simply continue adding lines to your .sqf file for each subsequent map item you would like to damage. You could use this in conjunction with blowing up buildings.
(back to top)
Remove or change position of map building
Use the 'IDs' button on the right to find the ID of the building you would like to remove from the map.
Click the 'Units' button and place a 'Game Logic' near the building on the map which you would like to remove. Name it 'building01' (or whatever you prefer) and place this code in its 'Initialization' field:
building01 = (position this nearestObject 000000);
The number '000000' needs to be switched out with the actual building ID and the 'Game Logic' name 'building01' also needs to be changed to the name you have chosen.
Select the 'Units' button once again and place any type of empty object you desire. It doesn't matter what it is as it will not be visible when we are done. Name this empty object 'building01attach' (again, the name is your choice) and place the following code in its 'Initialization' field:
this setPos [getPos this select 0, getPos this select 1, -100]; building01 attachTo[building01attach,[0,0,0]];
This will attach the building to the game object, which in turn will be moved under the ground one hundred meters, effectively hiding them both from view.
Using the same code and techniques from above you can move the building in a lateral direction simply by changing the '-100' to a zero. This will move the building to wherever the empty object is located on the surface of the ground and keep it in view.
You can now move the empty object to the location on the map where the building should be positioned. For further modification, the direction the building faces can be changed by adjusting the '[0,0,0]' code in the empty object.
If you do want to move the building and keep it in view, you may want to change the empty object to something small such as a baseball so that it will be less noticeable.
(back to top)
Create fire
Place down a unit and change the side to 'Game Logic'. In its 'Initialization' field copy & paste the following code:
BIS_Effects_Burn = compile preprocessFile "\ca\Data\ParticleEffects\SCRIPTS\destruction\burn.sqf";
nul = [this, 4, time, false, false] spawn BIS_Effects_Burn;
When you enter the game you will see a fire burning where the unit is located. You can place this code into any object (car, table, etc) and it will be set ablaze. You can also set a remote object on fire by changing the word 'this' to the name of the target unit.
The number '4' references the intensity of the fire (1-10), 'time' needs to be left as it is and 'false' sets the Lifecheck, which means it will burn as long as the unit is dead. Set this to false for inanimate objects such as buildings. Finally, 'false' refers to Fade - true will command the fire to fade out and die whereas false will keep it burning indefinitely.
You can create two other types of fire by utilizing the 'Campfire (burning)' and 'Barrel (burning)' units. Place these two objects on your map and insert this code in their 'Initialization' field:
The code will make both the barrel and the campfire wood disappear, leaving their fires intact and visible. These are especially useful if you would like a fire burning in a building you have collapsed. Once the building turns into rubble then the campfire and barrel will fall to the ground via gravity and appear within the ruins.
(back to top)
Modify player, AI and object damage
To make your player invincible, use this code in its 'Initialization' field:
AI and inanimate objects respond best to this code:
this addEventHandler ["HandleDamage", {false}];
Damage can be adjusted subtly or radically using this code:
this addEventHandler ["HandleDamage", {((_this select 2)/1.3)}];
The number at the end (1.3) is the number you will want to modify. A smaller number will allow more damage to occur on each hit whereas a large number will make your player much stronger.
In this case, 1.3 will allow your player to sustain damage from two to four clips from a Russian rifleman depending on the distance.
(back to top)
Animal class names
Pastor (dog)
Fin (dog)
Goat
Rabbit
Sheep
Cock (rooster)
Hen
WildBoar
Cow01 (brown)
Cow02 (brown)
Cow03 (black)
Cow04 (black)
(back to top)
Code for triggers
Jump to:
Change time / make cloudy
Message alert
Make anything a bomb
Play music or a sound
Set trigger activation height
Jump to Category: Modules
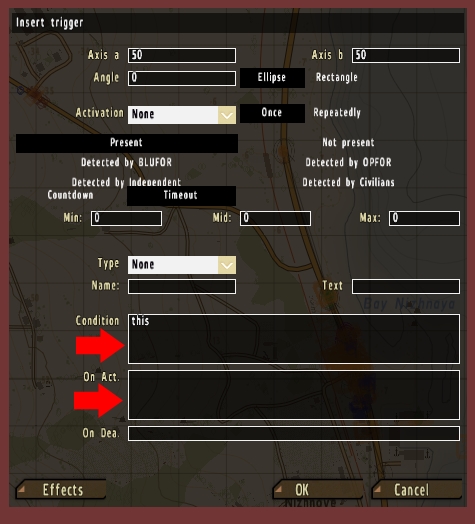
All of the trigger code snippets will be placed in the 'On Act.' field or the 'Condition' field of the trigger, as shown below:
Change time / Make cloudy
1 setovercast 1; skiptime 3;
These codes are placed in the 'On Act.' field and can be used together or separately. The skiptime number (3) adds this many hours to the current game time. You can place a timer on the trigger or have it activated immediately when a units steps into the trigger perimeter.
You can also trigger a specific date and time using the following code. Be mindful that the lighting for the specified hour (i.e. 17:30 hours) will different depending on the time of year.
setDate [2016, 06, 01, 17, 30];
(back to top)
Message alert
tText = "PLACE YOUR TEXT HERE,"; {tText = tText + "\n" + (name _x);} forEach thisList; hint tText;
This code is placed in the 'On Act.' field or script. Once triggered, the text will pop up followed by the player's names.
hq sideChat "PLACE YOUR TEXT HERE!";
This code is placed in the 'On Act.' field or script. This is the blue text that appears in the lower left-hand corner of the screen. To make this work, you will need to create a BLUFOR, OPFOR, INDEPENDENT OR CIVILIAN unit and name them hq (or whatever you prefer) and place them on the map away from the action. I would suggest entering the following code in their 'Initialization' field:
removeAllWeapons this; this forcespeed 0; this allowFleeing 0; this disableAI "ANIM"; this disableAI "MOVE"; this addEventHandler ["HandleDamage", {false}];
If they die they will no longer be able to communicate messages. In addition, only the members of hq's faction will be able to see the messages.
titletext ["PLACE YOUR TEXT HERE!", "PLAIN DOWN"];
hint "PLACE YOUR TEXT HERE!";
These two codes are fairly straight-forward. The titletext appears as the white text in the lower center of the screen and the hint pops up in a brown box in the upper right-hand corner of the screen.
["PLACE YOUR TEXT HERE", "updated for", name player] call bis_fnc_infoText;
This is the typed-out large white text in the lower right-hand corner of the screen. Just like all the other text codes, it can be placed in a trigger or script.
(back to top)
Make anything a bomb
Place down a unit and name it bomb01. Place down a trigger and set the 'Activation' field for the group you would like to trigger the bomb. In the 'On Act.' field enter:
bomb = "Bo_GBU12_LGB" createVehicle getPos bomb01
(back to top)
Play music or a sound
Set the trigger radius ('Axis a' & 'Axis b') and the 'Activation' field. In the 'On Act.' field copy & paste this code:
If it is a sound then put in this code:
Change "music01" and "sound01" to the name of your music score and custom sound. For additional information on importing custom music see this section of Making an Intro with the In-game Camera.
If you would like to use the ArmA 2 built-in music and sound library, click the 'Effects' button which is located in the lower left-hand corner of the trigger. You will be shown a list of seven categories:
Anonymous
Voice
Environment
Trigger
Track
Type
Effect
Select the desired music/sound from one of the dropdowns and then hit 'OK' twice. Any custom sounds you imported will be found under the 'Voice' category and can be activated via the 'Effects' button also.
(back to top)
Set trigger activation height
Put this code in the condition field of a trigger:
this AND (getPosATL (vehicle player) select 2) < 10
This means that the trigger will only be activated by a player that is less that ten meters above ground level. This code is ideal for ensuring that aircrafts flying through the trigger radius will not cause activation.
You can change '<' to '>' which now enables anything twenty meters or above ground level to set off the trigger. To create a trigger that has both a minimum and maximum height, use this code:
this AND (getPosATL (vehicle player) select 2) < 10 AND (getPosATL (vehicle player) select 2) > 4;
Now a unit will only set off the trigger if it is higher than four meters but not higher than ten meters. This is used for triggers in buildings that should only be activated on certain floors such as the second, third, etc.
(back to top)
Code for modules
Jump to:
Functions
Ambient Combat
UAV
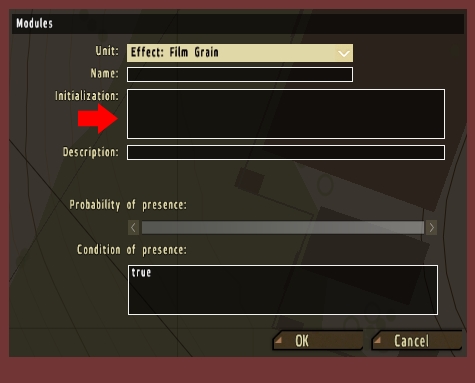
Module code belongs in the 'Initialization' field, as seen in the image below:
All other code will have specific instructions on where to place it.
Functions
The 'Functions' module is utilized by a wide range of processes and addons/mods for ArmA 2, so it is a good habit to place one down right away when you first begin creating a mission. If something is not working correctly in your map then chances are it requires a 'Functions' module.
A good example is activating a start message/greeting at the beginning of your mission.
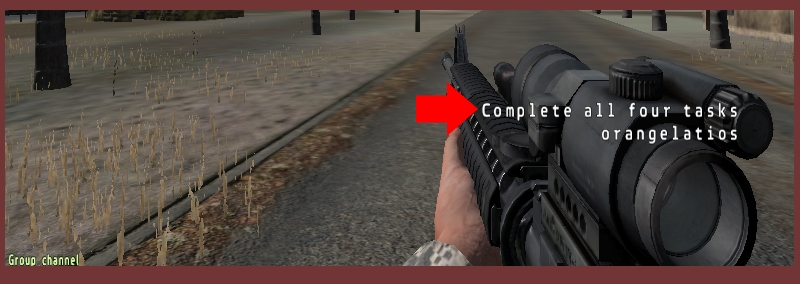
waitUntil {!isNil "bis_fnc_init"};
["Complete all four tasks", name player] call bis_fnc_infoText;
Go into the Editor and place down a function module. Then place the above code in your init.sqf file.
(back to top)
Ambient Combat
Place down an Ambient Combat Module (AMC) and name it 'ACM01'. Click the 'Synchronize' button on the right sidebar, click the module, drag over to your player and then release the mouse button. There will now be a blue line connecting them.
Access your mission folder and open the init.sqf file. Copy & paste the following code into it:
waitUntil {!isNil {ACM01 getVariable "initDone"}};
waitUntil {ACM01 getVariable "initDone"};
[1, ACM01] call BIS_ACM_setIntensityFunc;
[ACM01, 400, 1000] call BIS_ACM_setSpawnDistanceFunc;
[["USMC","RU","INS"], ACM01] call BIS_ACM_setFactionsFunc;
["ground_patrol", 1, ACM01] call BIS_ACM_setTypeChanceFunc;
["air_patrol", 1, ACM01] call BIS_ACM_setTypeChanceFunc;
The Ambient Combat Module will activate within a few minutes of gameplay and units will begin to randomly spawn around your player. On a side note, the Ambient Civilians and Ambient Animals modules can simply be placed on the map without any further modifications.
(back to top)
UAV
First place down a 'UAV' module followed by a UAV terminal. Next place down an 'MQ-9' (BLUFOR) or a 'Pchela-1T' (OPFOR). The drones must be occupied and not empty or they will immediately crash. Click the 'Synchronize' button on the right sidebar, click the module and drag over to your player first, then the terminal and then the drone. There will now be three blue lines running from the module to the units.
Place this code into the 'Inizialization' field of the drone:
this flyinHeight 600; this forceSpeed 400; this addEventHandler ["HandleDamage", {false}]; this setPos [getPos this select 0, getPos this select 1, 1000];
This will place the drone 1,000 meters in the air. Once it kicks in and begins flying it will drop to a height of 600 meters. You can also start the drone on a runway and allow it to takeoff and reach its flyinHeight on its own; however, there is a good chance it will crash shortly after takeoff.
(back to top)
