Mission tasks provide objectives for your players to achieve while exploring your map. It is a way to structure your mission with clearly defined goals that will heighten gameplay.
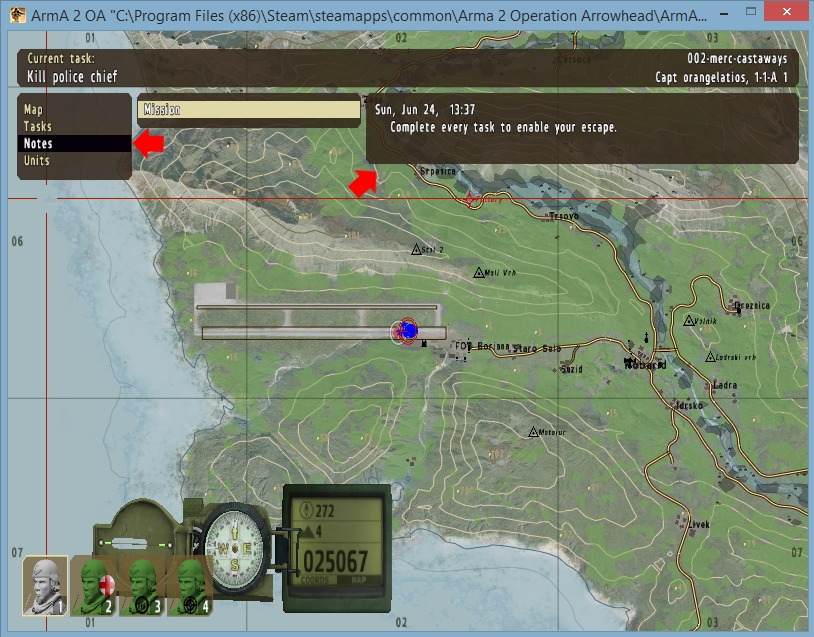
Each mission has a theme that umbrellas all tasks. You can create a mission theme that will be viewable in-game by the players. Click 'M' to display the map and then click 'Notes'.
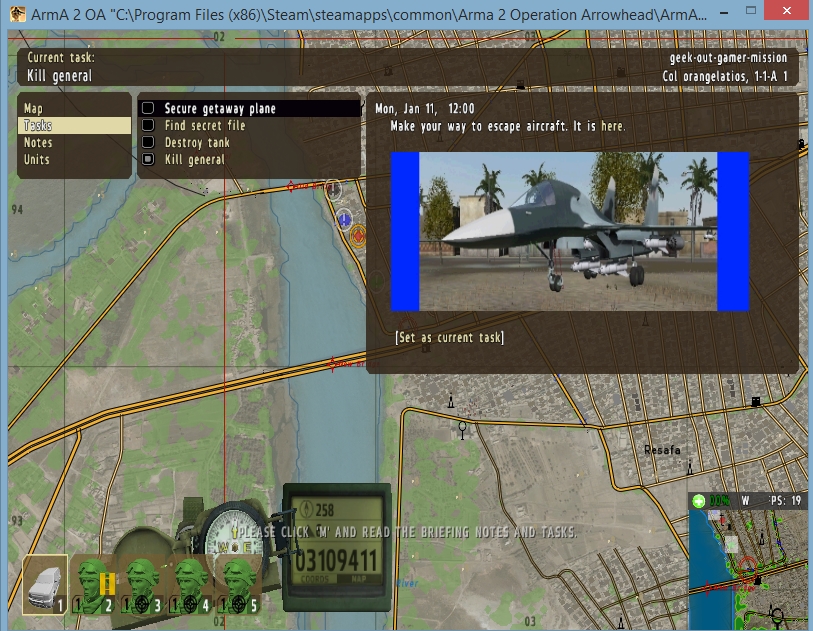
To view tasks, Click 'M' to display the map and then click 'Tasks'.
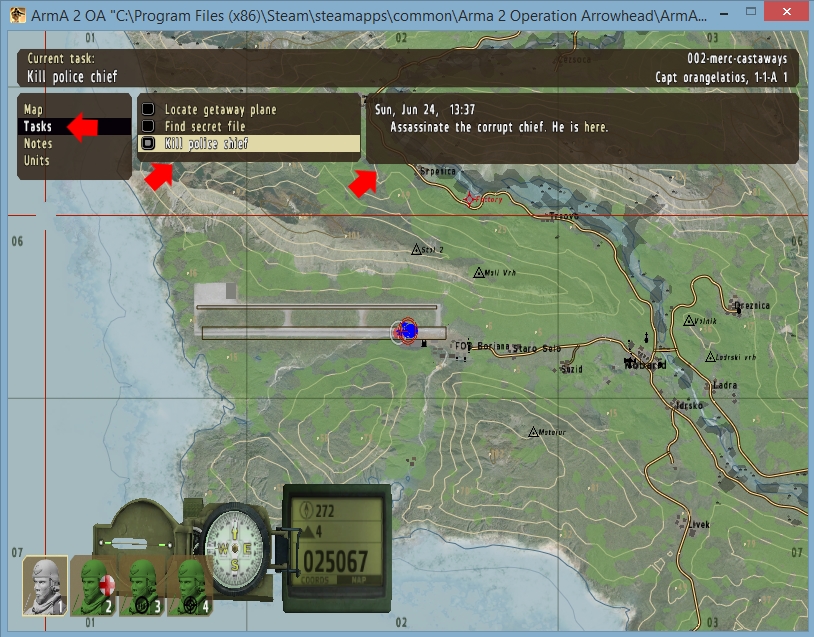
In this example, we have clearly stated in the notes what is to be achieved: "Complete every task to enable your escape." Simple and to the point. and we have given them three distinctly different tasks:
Kill police chief
Find secret file
Locate getaway plane
As players achieve these tasks they will be given a text alert and the task will be marked in green, indicating it has been completed.
Kill police chief
01
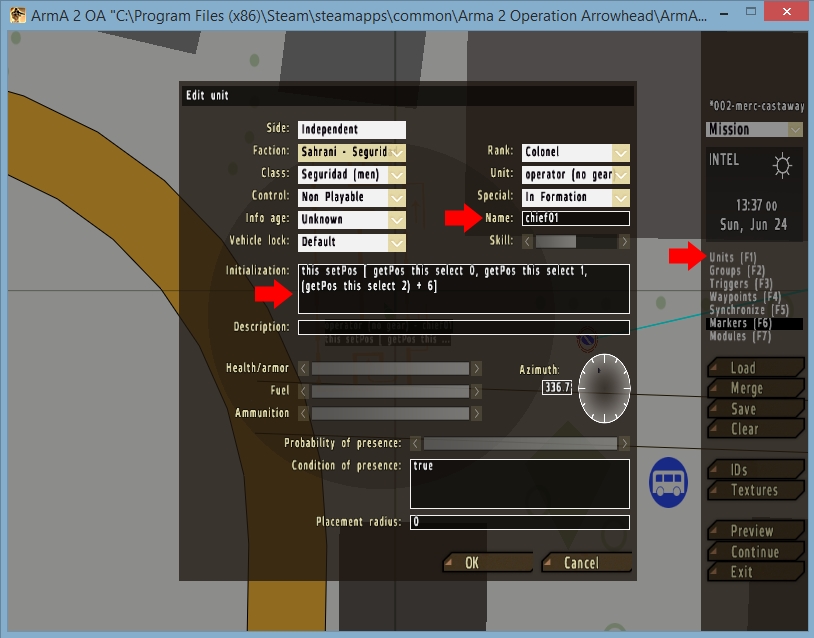
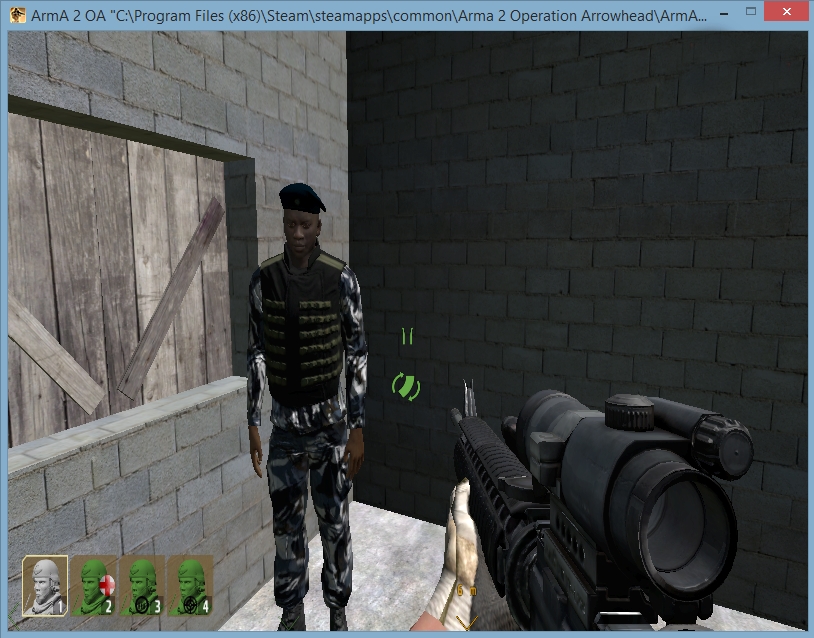
For illustrative purposes I have created a police chief as our target, but this setup and code will work for any soldiers or vehicles.
Select your desired location on the map and click the 'Units' button on the sidebar. Setup the parameters of your unit (Side, Faction, Class, etc) and then give it a unique name. I have named our police chief 'chief01'. The code in the 'Initialization' field is not related to setting up tasks and is optional. I have placed the police chief on the second floor of a building and the code dictates his height off the ground.
this setPos [ getPos this select 0, getPos this select 1, (getPos this select 2) + 6]
Change the number at the end of the code (6) to adjust the unit's height.
02
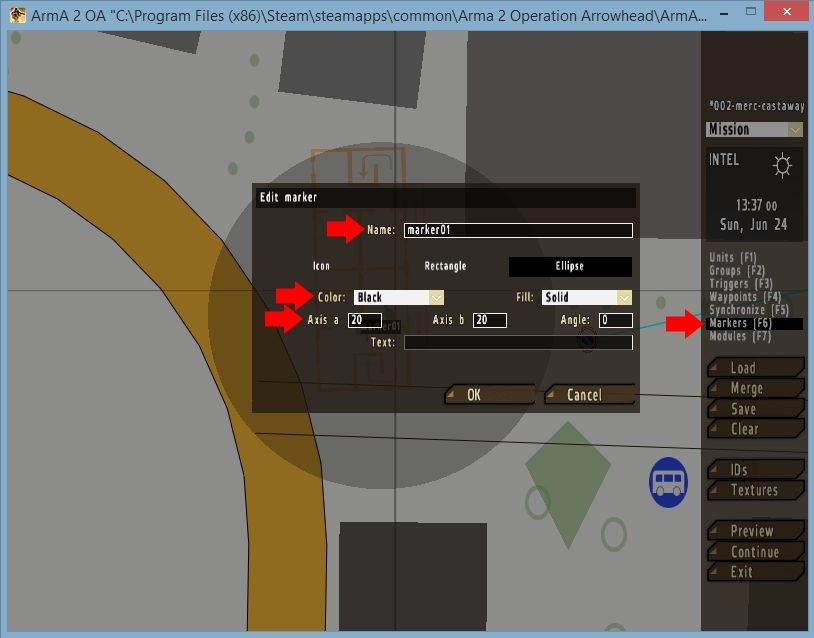
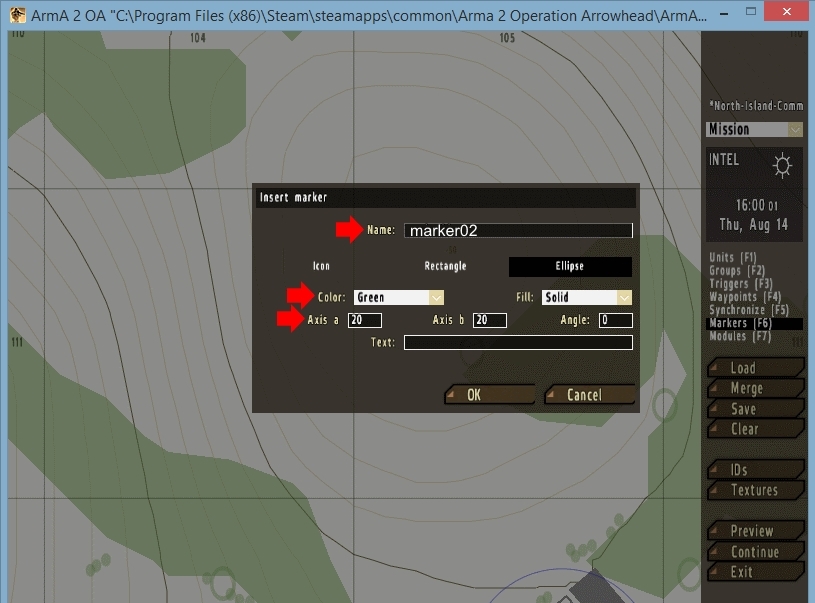
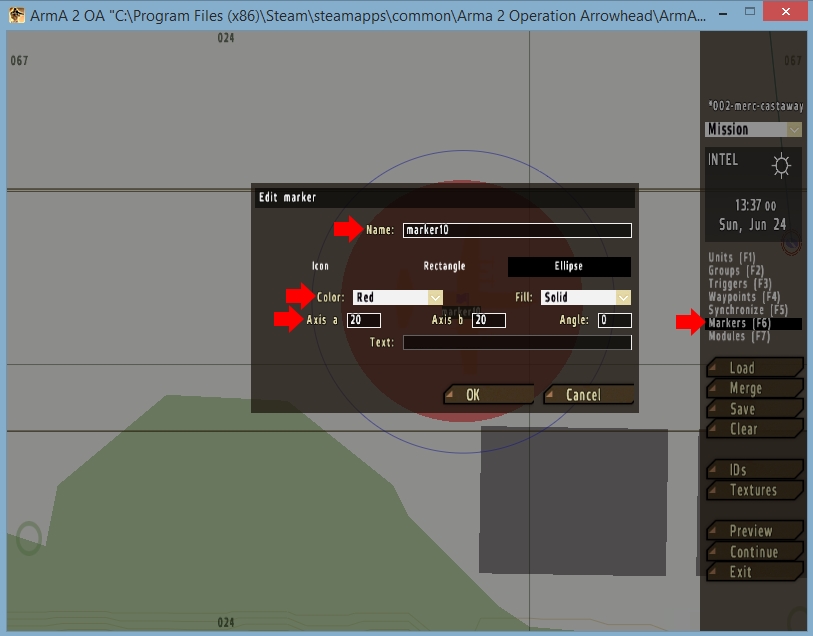
Click the 'Markers' button on the right sidebar. When the marker window opens enter a unique name in the 'Name' field. Select 'Ellipse' to make it round and then choose a color. Finally, set the 'Axis a' and 'Axis b' to at least twenty.
This will create a marker for your unit (i.e. police chief) so that players can find him.
03
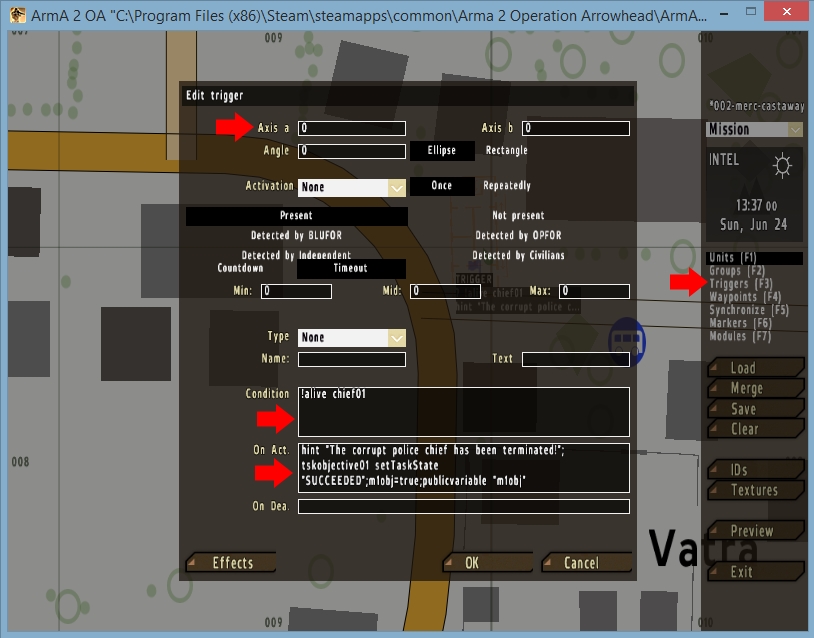
Click the 'Triggers' button on the right sidebar. Set the 'Axis a' and 'Axis b' to zero and then enter the following two code snippets in the 'Condition' field and 'On Act.' field respectively:
Condition
On Act.
hint "The corrupt police chief has been terminated!"; tskobjective01 setTaskState "SUCCEEDED";m1obj=true;publicvariable "m1obj"
The Condition code references the name we gave our police chief. We have provided an alert message for the players in the On Act. field so it is clear that the objective has been achieved. Also make note of the word 'tskobjective01'. It is the name of this particular objective. We will be using this code later.
04
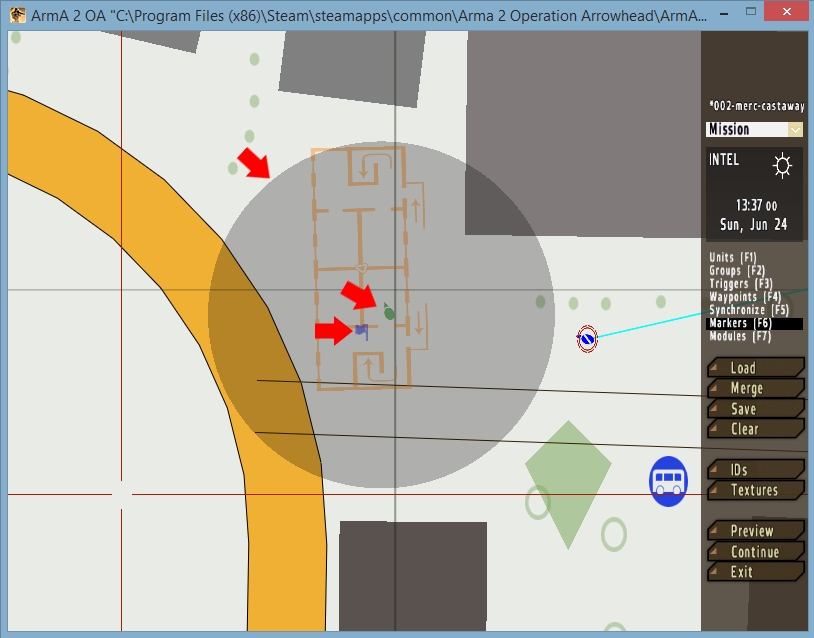
We have completed our setup of the task. The green dot is our police chief situated on the second floor of the building. The black circle is our marker. The small blue flag is the trigger.
05
Open up a text editor such as MS Notepad and copy the following text into it. There is a scrollbar beneath the code that you can use to view the entire sheet or just click the 'Copy to clipboard' button.
player createDiaryRecord["Diary", ["Mission", "Complete every task to enable your escape."]];

tskobjective01 = player createSimpleTask["Kill police chief"];
tskobjective01 setSimpleTaskDescription["Assassinate the corrupt chief. He is <marker name='marker01'>here</marker>.", "Kill police chief", "Kill police chief"];
tskobjective01 setSimpleTaskDestination (getMarkerPos "marker01");


player setCurrentTask tskobjective01;
Save the file as briefing.sqf and drop it into your mission folder. The path to your mission folder is either here:
C:\Users\User\Documents\ArmA 2 Other Profiles\YOUR NAME\missions\YOUR MISSION FOLDER
or here:
C:\Users\User\Documents\ArmA 2\missions\YOUR MISSION FOLDER
The briefing.sqf file is where all your tasks and mission notes are compiled. This is where the information is pulled from when your players click 'M' and view their notes and tasks (see very beginning or tutorial).
Open up another document in your text editor and place this code into it:
if (isServer) then
{
	[] execVM "briefing.sqf";
};

if(true) exitWith {};
Save this file as init.sqf and place it alongside your briefing.sqf file in the mission folder.
The first task is functional and if we wanted we could go in and assassinate the police chief right now...
What about multiple targets, such as a group of men that must be killed to complete the task? Give each of the units a unique name and then pull up the trigger. Edit both the 'Condition' field and 'On Act.' field, as in this example:
Condition
!alive soldier01 AND !alive soldier02 AND !alive soldier03
On Act.
hint "The three enemies have been terminated!"; tskobjective01 setTaskState "SUCCEEDED";m1obj=true;publicvariable "m1obj"
The police chief has been replaced by three enemy soldiers, each named soldier01, soldier02 and soldier03. The requirements (tskobjective01) now dictate that all three must be killed to fulfill the conditions of the task. Now all you need to do is alter information in the briefing.sqf file.
Find secret file
06
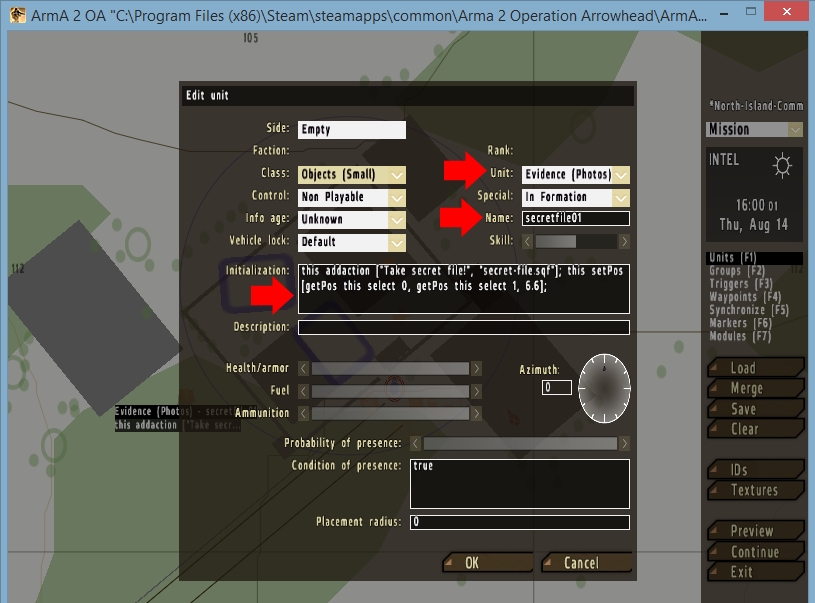
Setting up the secret file task will be very similar to setting up the previous task but with some some additional coding required. In this example I clicked on 'Units' and created an 'Evidence (Photos)' unit which is found in the 'Objects (Small)' category.
Fill in the 'Name' field with a unique name. Here I have chosen 'secretfile01'. As in the previous task, I have entered height code because the unit is placed on the second floor of a building. The required code for this task is as follows and should be placed in the 'Initialization' field:
this addaction ["Take secret file!", "secret-file.sqf"];
Open up your text editor once again and enter the following code into it:
deletevehicle secretfile01;
tskObjective02 setTaskState "SUCCEEDED";
Save the file as secret-file.sqf and drop it into your mission folder. This file will take care of deleting the file folder once it is collected and then mark the task as completed.
07
Create a marker near the file and configure it as was done in the previous task.
08
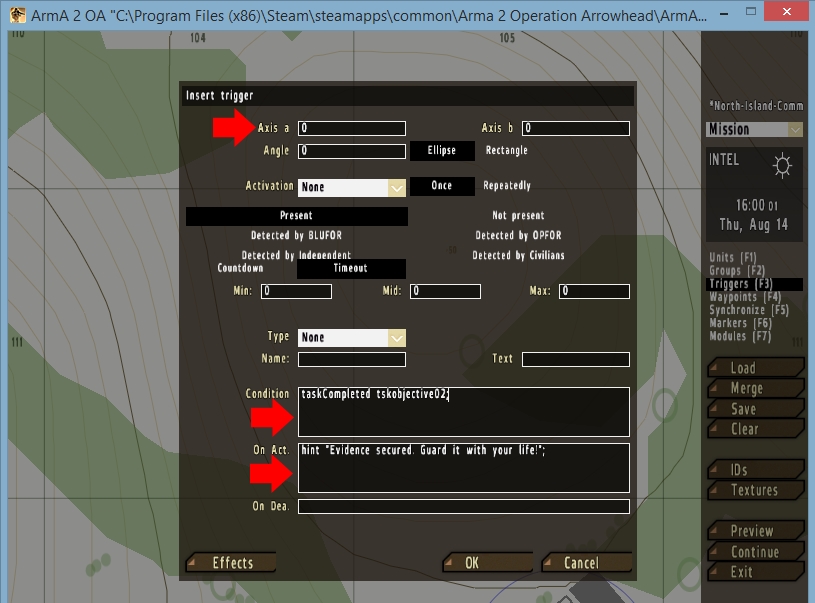
Place a trigger near the file and set 'Axis a' and 'Axis b' to zero. Place this code in the 'Condition' field:
taskCompleted tskobjective02;
And this code in the 'On Act.' field:
hint "Evidence secured. Guard it with your life!";
Notice that in the 'Condition' field we reference 'tskobjective02'. The is the name of the task.
Open up briefing.sqf and paste the following code into it right after the information for 'tskObjective01'.
tskObjective02 = player createSimpleTask ["Find secret file"];
tskobjective02 setSimpleTaskDescription["Secure the evidence proving the general's guilt. It is <marker name='marker02'>here</marker>.", "Find secret file", "Find secret file"];
tskObjective02 setSimpleTaskDestination (getMarkerPos "marker02");
09
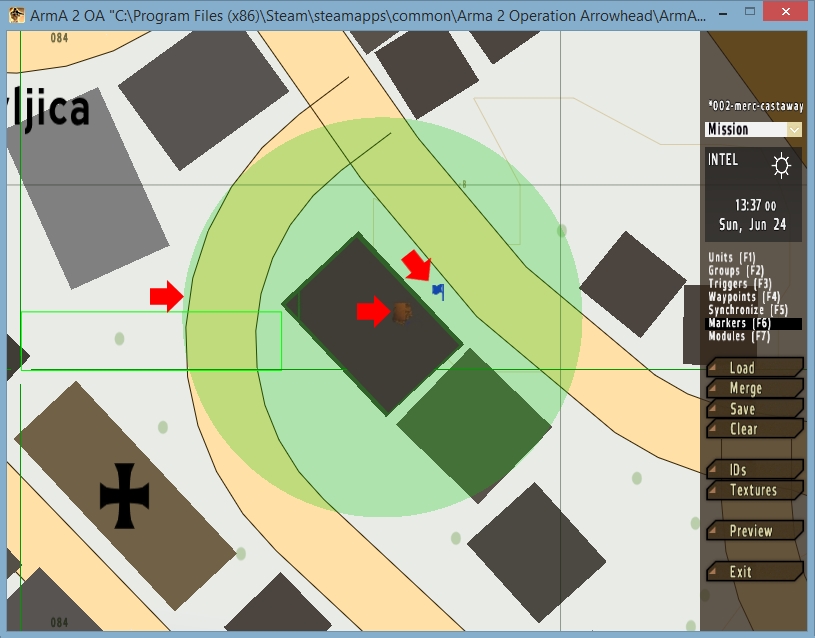
The task is set up and functional. The marker has been placed to alert players to the location. The secret file is situated on the second floor of the building. you have created the secret-file.sqf file and added the task info to briefing.sqf. The trigger is active and ready.
10
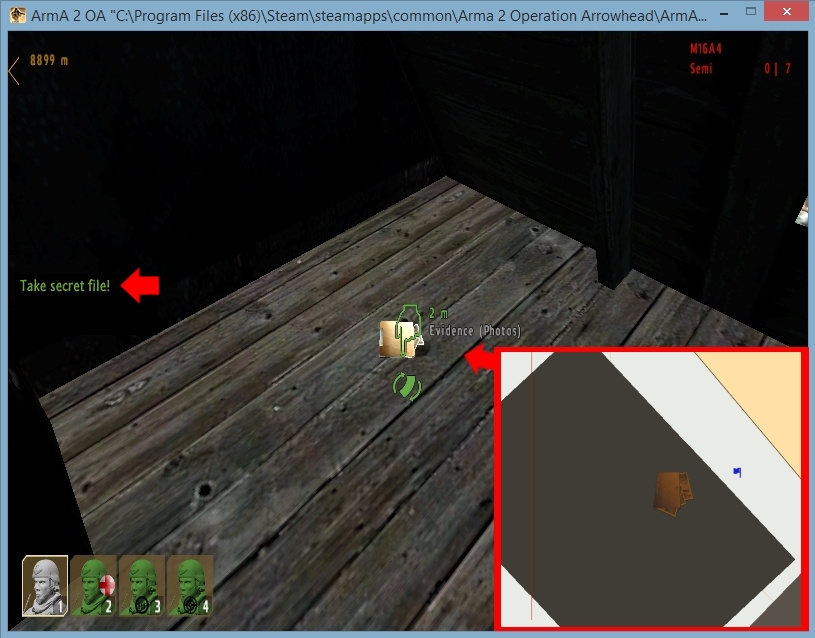
When players locate the file and hover over it they will see the text 'Take secret file!' displayed on the left side of the screen. When selected, the file will disappear, they will receive a text message confirming the task has been completed and the task will be marked in green on their tasks list.
EXTRA: Would you like to add images to your tasks? Simply modify this line of code in your briefing.sqf:
tskobjective01 setSimpleTaskDescription["<br/><br/>Assassinate the corrupt Russian general.<br/><br/><img image='pic-kill-general.paa' /><br/><br/>", "Kill general", "Kill general"];
An ideal size for the image is 450px x 150px. Must be in .paa format.
Locate getaway plane
Option A
11
Since this is the final task, I have jumped ahead numerically and am calling this task ten. This will allow us the latitude of entering more tasks later.
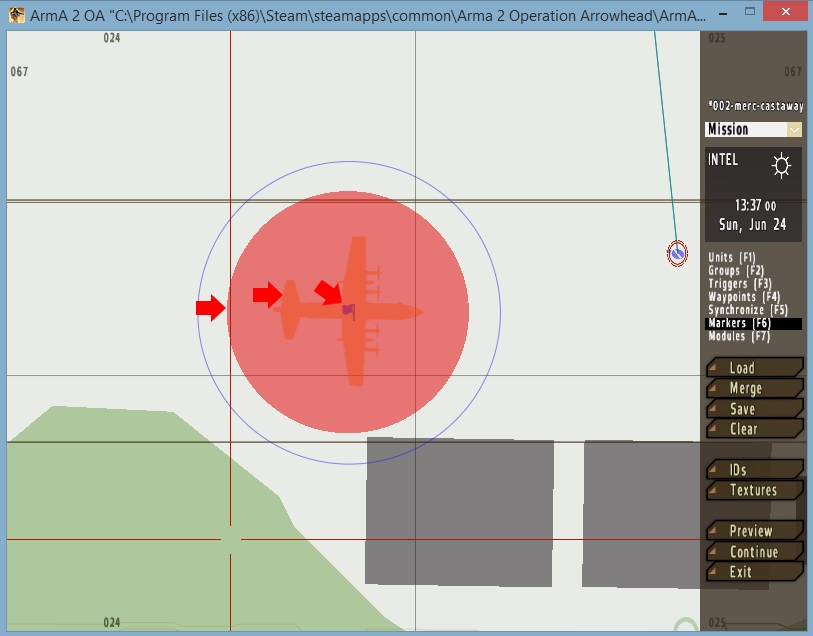
Go ahead and create any type of plane you want. For this exercise I have chose the C130J. After the aircraft is placed (preferably on a runway!) create a marker, just like we did in the two previous tasks.
12
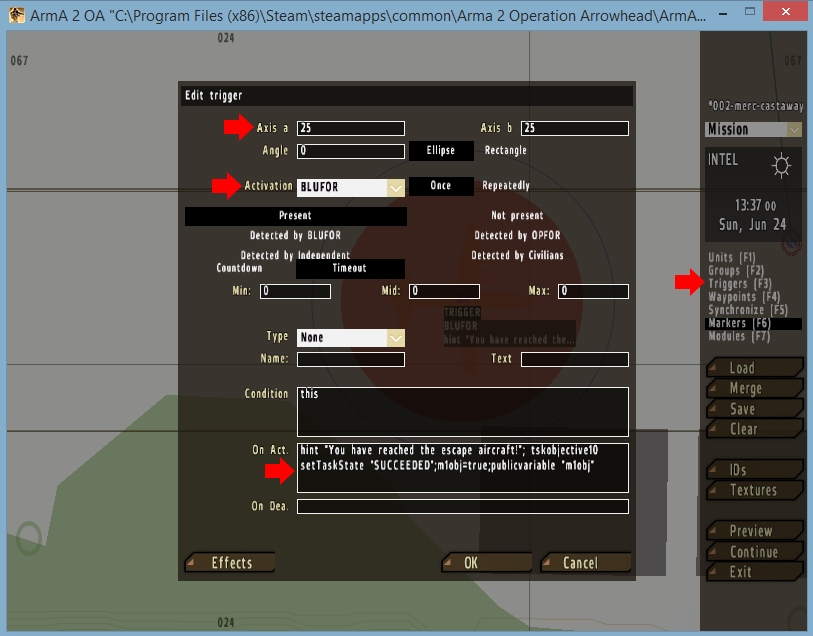
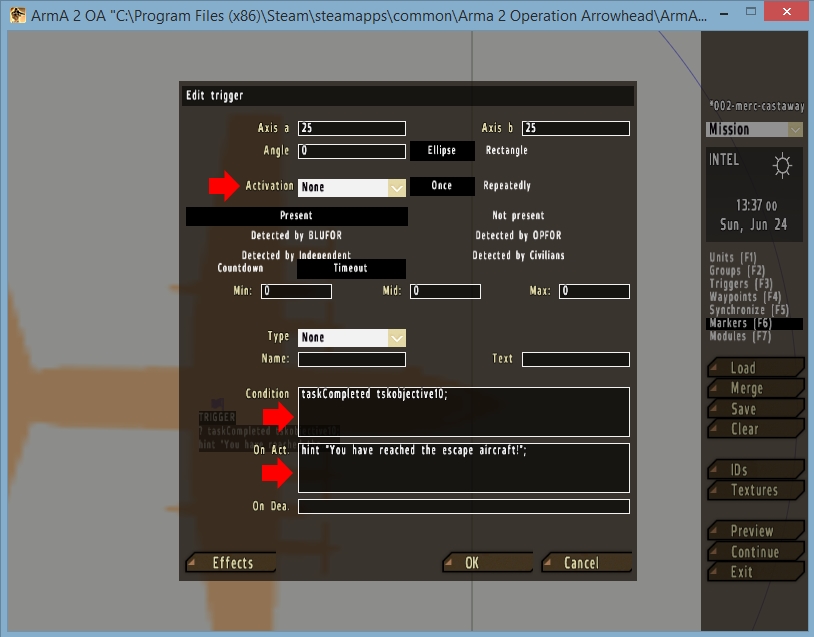
Place a trigger on the center of the plane. When adjusting 'Axis a' and 'Axis b' of the trigger make sure it covers the entirety of the airplane. To cover the C130J adequately I have entered twenty-five in both fields.
From the 'Activation' dropdown select your players' side. In this case it is 'BLUFOR'. In the 'On Act.' field enter this code:
hint "You have reached the escape aircraft!"; tskobjective10 setTaskState "SUCCEEDED";m1obj=true;publicvariable "m1obj"
Here we have defined the name of this task, which is 'tskobjective10'.
Open up briefing.sqf and paste the following code into it right after the information for 'tskObjective09'.
tskobjective10 = player createSimpleTask["Locate getaway plane"];
tskobjective10 setSimpleTaskDescription["Make your way to escape aircraft. It is <marker name='marker10'>here</marker>.", "Locate getaway plane", "Locate getaway plane"];
tskobjective10 setSimpleTaskDestination (getMarkerPos "marker10");
13
Our getaway plane is all set up. We have our marker so players can find it and the trigger is set to activate when any player enters its perimeter (big blue circle). Once activated the players will receive a message and the task will be marked as completed.
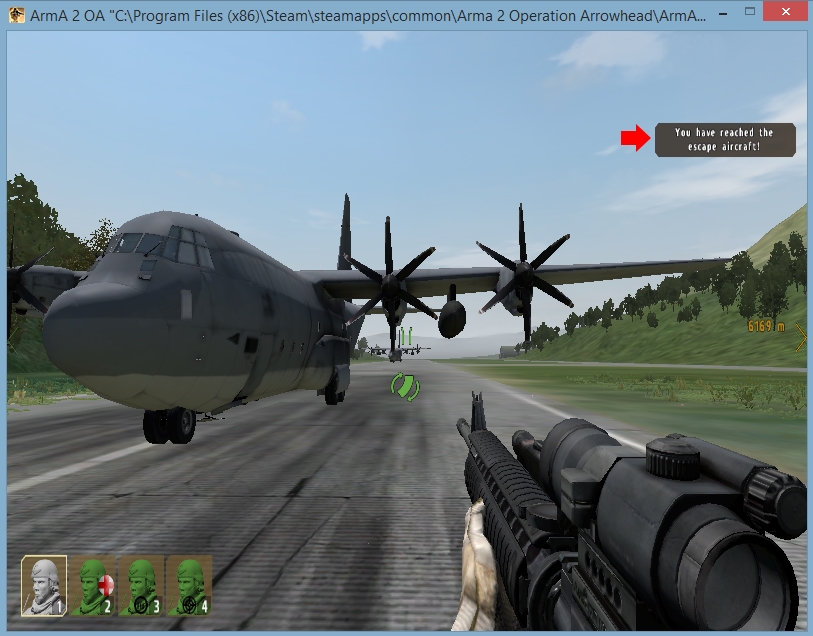
14
As illustrated in the image below, the player has entered the trigger and been alerted that the task has been completed via the black box message located in the upper right-hand corner of the screen.
Option B
15
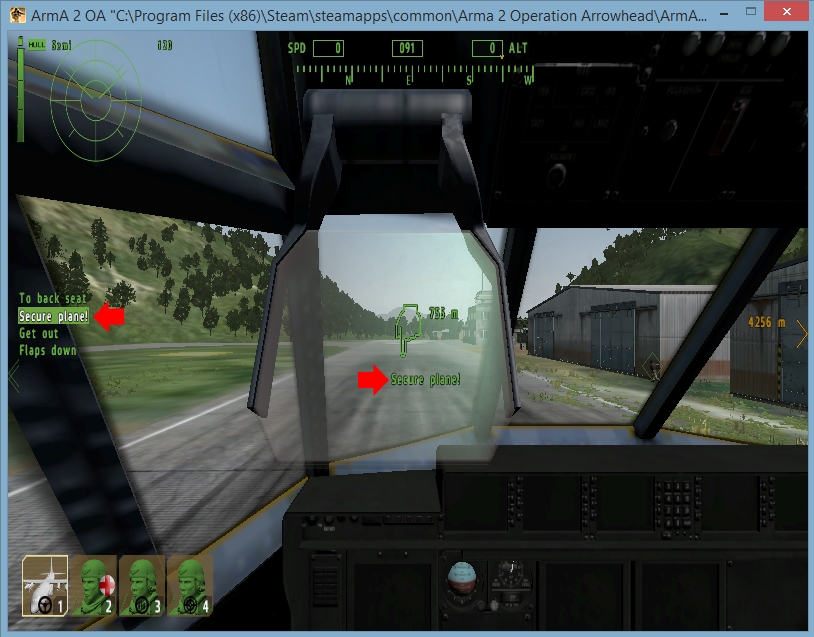
In this escape aircraft scenario we offer an alternative way to complete the mission. Instead of entering a trigger area as in the first scenarios, the player must enter the aircraft and then actively choose to secure the plane to complete the task.
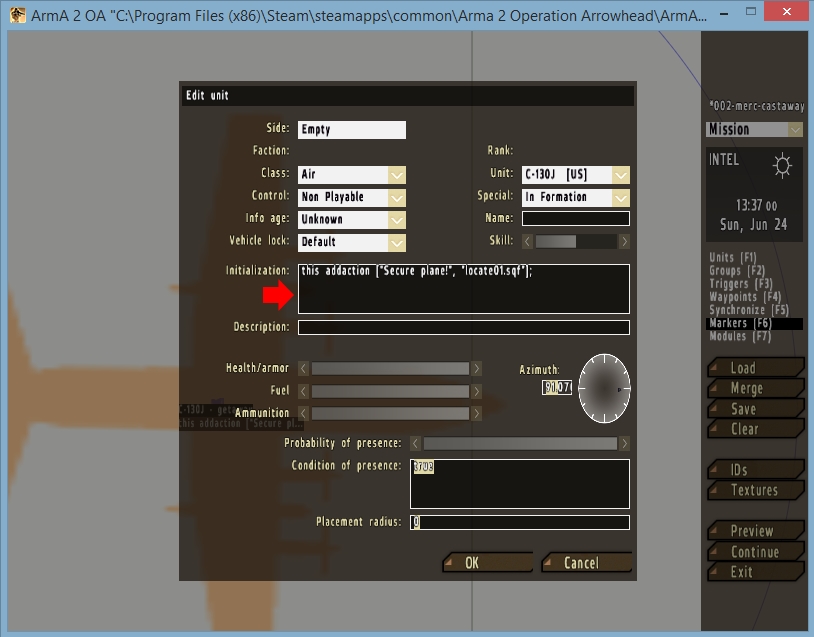
Everything is set up from the first scenario so we only need to make a few adjustments. Double-click on the airplane to open its window. Enter this code in the 'Initialization' field:
this addaction ["Secure plane!", "locate01.sqf"];
Open up your text editor once again and place this code into it:
tskObjective10 setTaskState "SUCCEEDED";
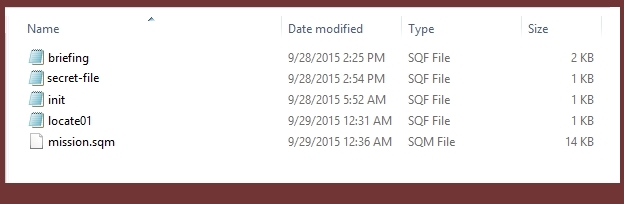
Save this file as locate01.sqf and place it in your mission folder. At this point you should have five files in your mission folder: briefing.sqf, secret-file.sqf, init.sqf, locate01.sqf and mission.sqm.
16
Double-click the trigger and enter this code in the 'Condition' field:
taskCompleted tskobjective10;
And this needs to go into the 'On Act.' field:
hint "You have reached the escape aircraft!";
17
After the player is seated in the plane they will be given an option in green on the left side of the screen to 'Secure plane!' When they select it they will receive a text alert stating that the plane has been secured and then the mission will be marked as completed.
18
All tasks completed
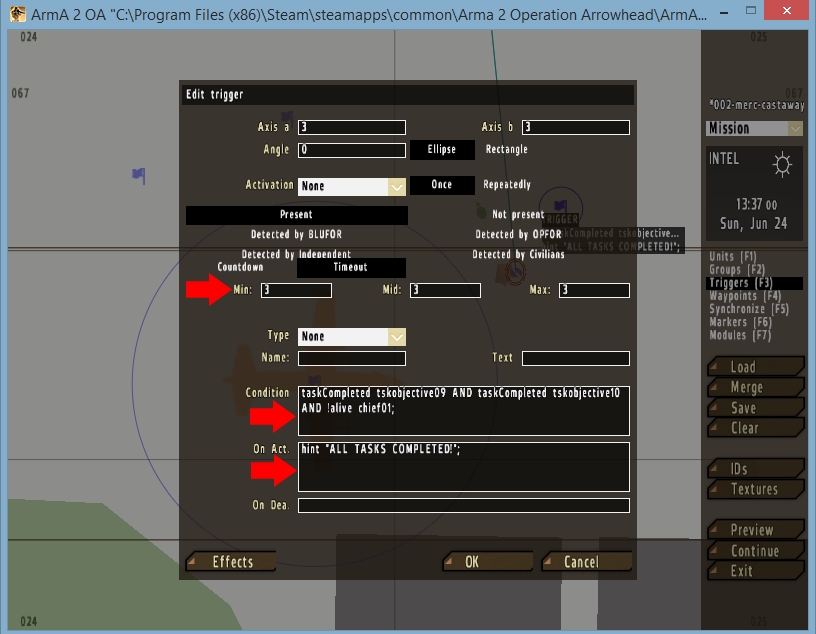
If you would like to display a special message to the players after all tasks have been completed, you must first create a new trigger. Set the 'Min' 'Mid' and 'Max' times to at least three. This will delay the message for three seconds, which will allow time for the last task completion message to display without interruption.
In the 'Condition' field you will need to enter each task name or condition with an 'AND' in between each statement, as in the code below:
taskCompleted tskobjective02 AND taskCompleted tskobjective10 AND !alive chief01;
In the 'On Act.' field place this code:
hint "ALL TASKS COMPLETED!";
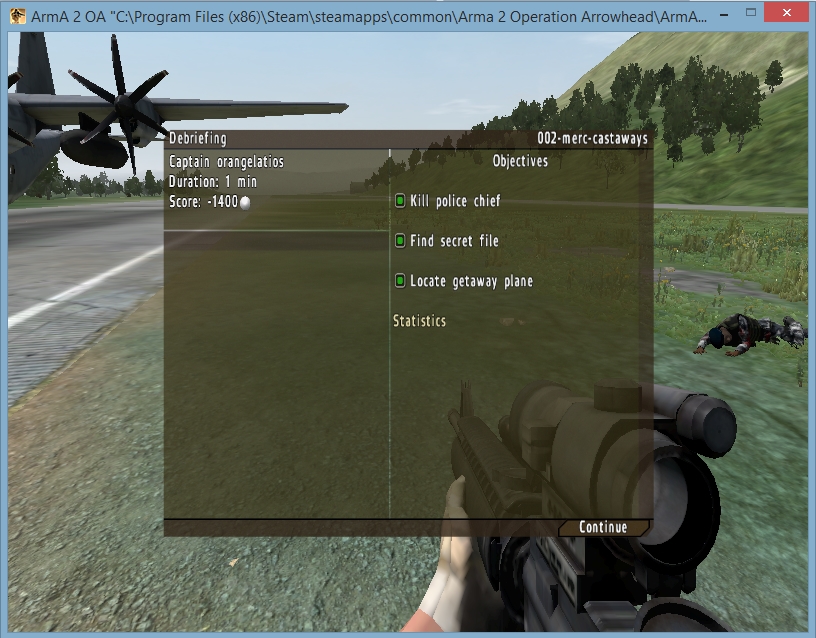
Every task will need to be completed (in any order) for the message 'ALL TASKS COMPLETED!' to display. To actually end the game at that point you can change the trigger type to 'End #1' (right now it is 'None') and replace the code in the 'On Act.' field with this:
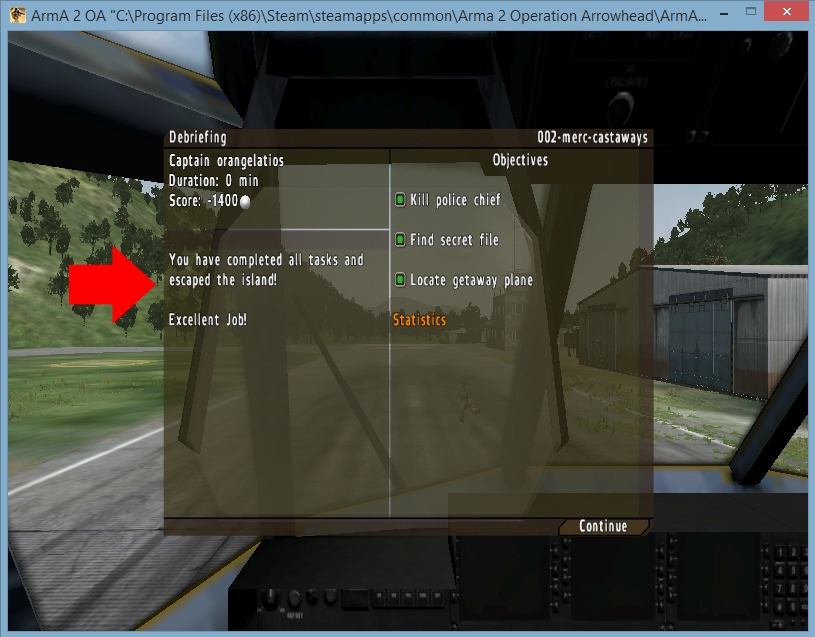
All players will be taken to debriefing, as seen below:
If you would like to add a custom message to the debriefing window, open your text editor and copy this code into it:
<html>

<head>
<meta http-equiv="Content-Type" content="text/html; charset=windows-1250">

<title>Title</title>
</head>

<body bgcolor="#FFFFFF">
<! -----DEBRIEFING----->
<br />
<h2><a name="Debriefing:End1">You have completed all tasks
and escaped the island!</a></h2>
<br />
<p>
Excellent Job!
</p>
<br />

</body>
</html>
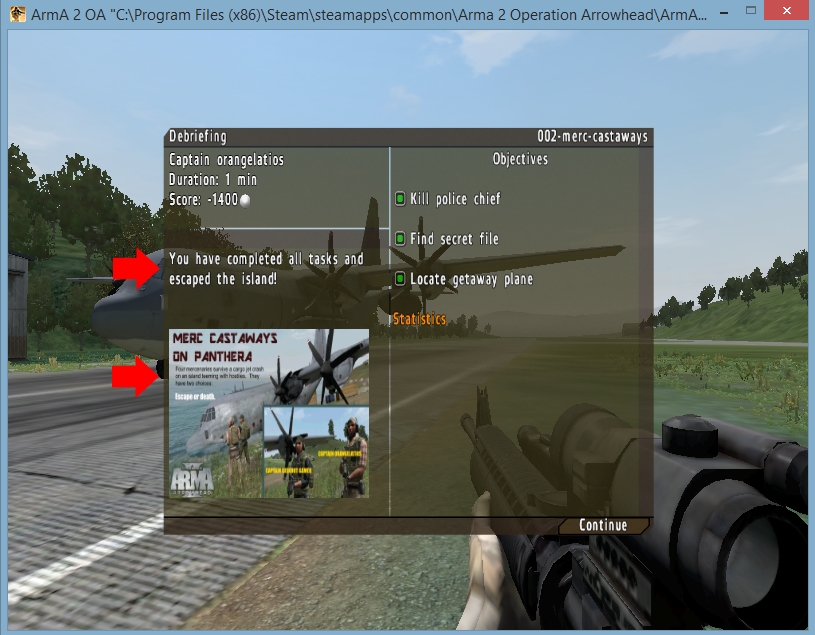
Save it as briefing.html and place it into your mission folder. Now run your mission and you will see the message prominently displayed on the left of the debriefing window, as in the image below:
If you would like to add a custom message and a custom image (such as the mission splash screen) to the debriefing window, open your briefing.html file and copy this code over the previous code:
<html>
<head>
<meta http-equiv="Content-Type" content="text/html; charset=windows-1250">

<title>Title</title>
</head>

<body bgcolor="#FFFFFF">
<! -----DEBRIEFING----->
<br />
<h2><a name="Debriefing:End1">You have completed all tasks
and escaped the island!</a></h2>
<br />
<br />
<img src="pictures\debriefing.paa" alt="mission splash mini" title="mission splash mini" />
<br />
<br />

</body>
</html>
Create a folder, name it 'pictures' and place it into the mission folder. This is where your image will go once it is created. There will be some distortion to the image aspect ration; however I have found the dimensions 250 x 160 work well.
The name of the image will need to be entered in the briefing.html file (see line 17 above) and will need to be in .paa format so that it is encoded into the mission .pbo file. You can learn how to create a .paa file in the article.
Here is a fully fleshed-out briefing.sqf file that includes everything discussed in the tutorial plus additional notes/tasks for OPFOR, Resistance and Civilians. You can copy this over the code in your original briefing.sqf file.
waitUntil { !isNull player };
waitUntil { player == player };

switch (side player) do
{

	case WEST: // BLUFOR briefing goes here
	{
		player createDiaryRecord["Diary", ["Mission", "<br />Complete every task to enable your escape."]];
		player createDiaryRecord["Diary", ["Summary", "<br />Your team was hired to protect a plane full of valuable cargo. The aircraft made an emergency landing on Panthera and crashed."]];

		// Objectives

                tskobjective01 = player createSimpleTask["Kill police chief"];
                tskobjective01 setSimpleTaskDescription["Assassinate the corrupt chief. He is <marker name='marker01'>here</marker>.", "Kill police chief", "Kill police chief"];
                tskobjective01 setSimpleTaskDestination (getMarkerPos "marker01");

                tskObjective02 = player createSimpleTask ["Find secret file"];
                tskobjective02 setSimpleTaskDescription["Secure the evidence proving the general's guilt. It is <marker name='marker02'>here</marker>.", "Find secret file", "Find secret file"];
                tskObjective02 setSimpleTaskDestination (getMarkerPos "marker02");

                tskobjective10 = player createSimpleTask["Locate getaway plane"];
                tskobjective10 setSimpleTaskDescription["Make your way to escape aircraft. It is <marker name='marker10'>here</marker>.", "Locate getaway plane", "Locate getaway plane"];
                tskobjective10 setSimpleTaskDestination (getMarkerPos "marker10");

                player setCurrentTask tskobjective01;

	};


	case EAST: // OPFOR briefing goes here
	{

		player createDiaryRecord["Diary", ["Info", "Information goes here"]];
		player createDiaryRecord["Diary", ["Info 02", "Information goes here"]];


		// Objectives

                tskobjective11 = player createSimpleTask["New task goes here"];
                tskobjective12 = player createSimpleTask["New task goes here"];

                player setCurrentTask tskobjective11;

	};


	case RESISTANCE: // RESISTANCE/INDEPENDENT briefing goes here
	{

                player createDiaryRecord["Diary", ["Info", "Information goes here"]];

		// Objectives

                tskobjective13 = player createSimpleTask["New task goes here"];

                player setCurrentTask tskobjective13;


	};


	case CIVILIAN: // CIVILIAN briefing goes here
	{

                player createDiaryRecord["Diary", ["Info", "Information goes here"]];

		// Objectives

                tskobjective14 = player createSimpleTask["New task goes here"];

                player setCurrentTask tskobjective14;


	};

};
written by RJ Wattenhofer
