written by RJ Wattenhofer
Jump to:
Hypercam 2 Hot Keys
Hypercam 2 AVI Recording Specs
Hypercam 2 Sound Recording
Hypercam 2 Finished Example Video
The Hypercam 2 Screen Recorder is software designed for the sole purpose of
capturing your computer screen display in AVI video format. It is ideal for creating video tutorials, as all
the action is captured, including cursor movements. In particular, I highly recommend it for gaming
tutorials. The resolution is crisp & vibrant and renders nicely for HD quality videos on YouTube, an
important aspect if you want to make superior gaming tutorials.
The software is completely free and has no annoying watermarks, enabling you to create professional,
high-quality AVI video footage suitable for most any media project that can then be converted nicely to
.mp4, .webm or .ogv file formats. You can download a free copy of Hypercam 2
on download.cnet.com.
After you have installed the software, open it and it will pop up as a small 408px by 311px window. The
beauty of Hypercam 2 is that it is both visually and intrinsically compact, completely non-obtrusive in form
& function which allows you to readily create videos unabated and unhindered by any technical constraints.
Below we see an image of the Hypercam 2 window with the 'Screen Area' tab exposed. Please make note of the red
arrows. Before we begin recording, the Hypercam 2 parameters must be set up for your specific project.
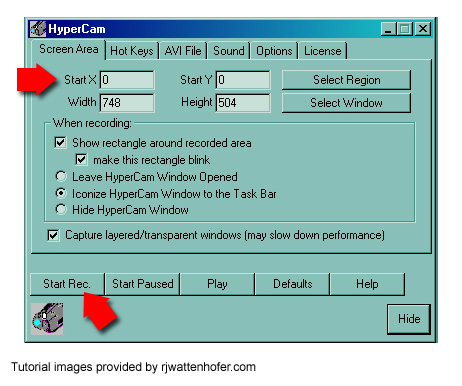
The first red arrow points out the 'Select Region' line and button. Currently it is set at zero for both the X
and Y coordinates, meaning no area has been selected. The second red button points to the 'Start Recording' button.
This is the primary button you will use when starting and stopping your video recording.
For purposes of this tutorial, I have decided to use the Facebook game 'Marketland' as our example video project.
Below you will see an image screenshot of the game set in an iframe within Facebook. (I haven't played the game for
quite awhile, and you can see the store is quite a mess...).

If we were really creating a gaming tutorial about Facebook's Marketland, we would only want to capture the
actual game screen and not the periphery (the advertising to the right and the non-essential areas above &
below), so this must be eliminated.
We accomplish this by clicking the 'Select Region' button on Hypercam 2 and then clicking our cursor on the
upper left corner of the game screen. Drag your cursor down and to the right, until the grey box (see image above)
encompasses only the edges of the actual game. You will notice that Hypercam 2 alerts you to real-time screen
recording dimensions (red circled area above) as you drag the cursor.
Once you have reached the desired size, click the cursor and Hypercam 2 will record the coordinates in the
'Select Region' boxes (see image below).

Since I began the screen area drag in the far upper left, the X coordinate remains at zero, while the Y
coordinate records our adjusted position via the cursor click in the lower right-hand corner of the game screen.
We have now created our recording canvas and are ready to finish setting up the remaining Hypercam 2 parameters.
Hypercam 2 Hot Keys

Hypercam 2 has default hot keys, found on the 'Hot Keys' tab:

If for some reason you have difficulty using the hot keys during your recording
(sometimes they do not respond) you can use the 'Start Recording' button to stop and start your video recording.
The hot keys are the preferred method of manipulation because the Hypercam 2 window remains hidden and does
not pop up into view. If you rely on using the 'Start Recording' button, be aware that you must open the
Hypercam 2 window, which will cause it to overlap your recording canvas and thus end up on your video footage.
In this case, plan ahead a bit and record a few extra seconds of video on the front & tail ends of your
project, thereby allowing you to chop the tainted footage off in your video editor and thus maintain the integrity
of the footage you want to keep.
Hypercam 2 AVI recording Specs
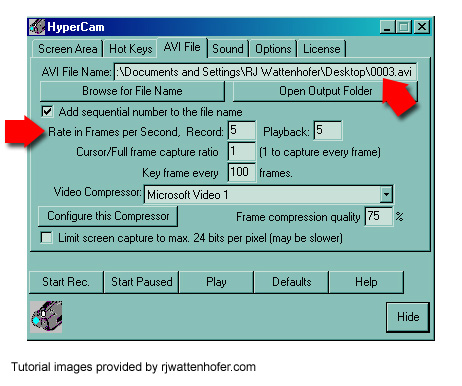
Click on the 'AVI FIle' tab. It is here that you can change the default file name (0001.avi) and choose the file
path/saved location of the finished AVI recording. You will need to adjust the numbers on the 'Rate in Frames per
Second' line. When you first install Hypercam 2, the default settings for both 'Record' and 'Playback' are ten.
If left at this setting, your finished video may be extremely sluggish and have a slideshow quality, depending
on what media you have captured. It may seem counter-intuitive, but the settings for both boxes should be five
for extremely motion-oriented media, such as game recording. Feel free to play with the settings in order to
capture the highest quality video for your project: Again, I have found five to be the best setting for games.
Hypercam 2 Sound Recording
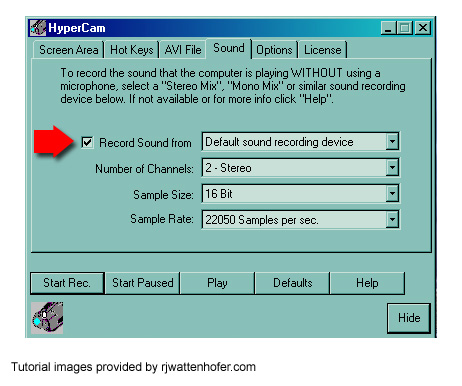
Click on the 'Sound' tab to adjust your Hypercam 2 sound recording settings:
If you are planning to lay down a separate sound track in your video editor and do not want to record sound
via Hypercam 2, simply uncheck the box next to the red arrow in the image above. If you do want to record sound,
make sure to check the box, pick your preferred sound recording device from the dropdown list and make sure the
'Number of Channels' line is set on '2 - Stereo'.
In this case, we do want to record the background music and sound effects of the Marketland game, so I have set
up the parameters to match the image above. We now need to adjust the recording settings of our PC. Right click
on your volume control icon, most likely found in the bottom right hand corner of your screen. After you right
click on the icon you will need to click on 'Open Volume Control' (Windows XP) or 'Recording Devices'
(Windows Vista and later). The image below outlines the next steps:
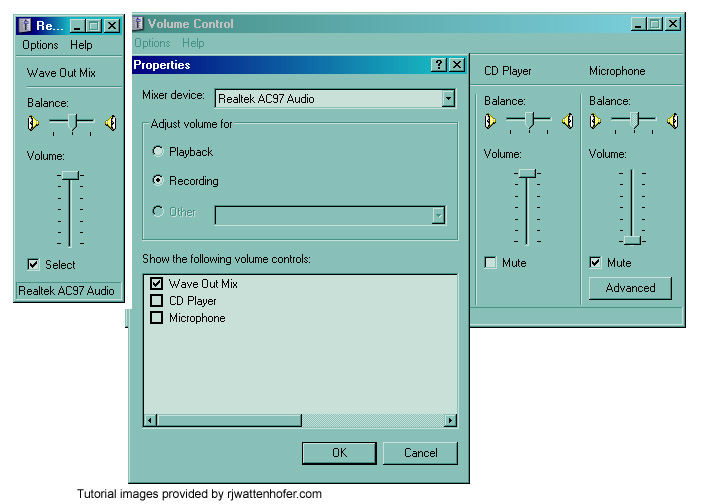
Once the volume control window pops up, click on 'Options' on the menu and then click 'Properties'. Next, click
the 'Recording' radio button, which will open up a new selection window. The list now displayed will vary depending
on your operating system. If you are running Windows XP, make sure the only box selected is 'Wave Out Mix'. If you
are running Windows Vista or later, check off the 'Stereo Mix' box (not seen in image above).
Click 'OK' and a new, tiny window will pop up (see far left on image above) named either 'Wave Out Mix' or
'Stereo Mix'. Slide the volume control up to the max and click the 'Select' box.
If you do not see either option, right click the window, click on 'Disabled Devices', right click on "Stereo Mix'
and then click 'Enable'. If you do not have the option to enable 'Stereo Mix' you will need to update your Realtek
Driver.
HOW TO UPDATE DRIVER: Go to start, right click 'Computer', click 'Properties', then click on
'Device Manager'. Click on the sound option and right click 'Realtek High Definition Sound'. Now, click
'Properties' and then click the 'Driver' tab followed by the 'Update Driver' button.
You are all set now to record your video in sound. Now that you have set up all the basic parameters of
Hypercam 2, you are now ready to record your first video.
Hypercam 2 Finished Example Video
Below is the end result of our recording efforts. You can view the video by clicking on it or see it on
YouTube.
The video is by no means a complete tutorial; this is just the raw footage uploaded to show you exactly
what Hypercam 2 is capable of when utilized properly.
~ RJ Wattenhofer, September 3, 2013