written by RJ Wattenhofer
All code and files presented in this tutorial can be downloaded as a package by clicking the 'Download mission files' button located in the upper right-hand corner of this page.
A note on file paths: You may instinctively use forward slashes (/) when creating file paths, which will result in an error. All file paths use back slashes (\) as in this example: null = [this] execVM "loadouts\loadout-player-01.sqf";

The mission file directory
 The mission folder is divided between individual files placed in the directory root and folders that contain additional files which perform similar functions. The image on the left demonstrates a directory system which I developed that keep files organized very nicely.
Aside from the mission.sqm file, all of these files and folders will need to be made by you after the mission is created.
You may find it beneficial to download the mission package from this page, open it in ArmA2 and then reference it as you read through this article.
The init.sqf file
This is the primary file you will create for your mission. All code in the init.sqf file is immediately activated the moment the mission is launched. The sample code provided can be modified and/or deleted and additional code can be added at your discretion.
// -----INITIATE FUNCTION MODULE IN-GAME
waitUntil {!isNil "bis_fnc_init"};

// -----REMOVE ALL GRASS FOR FPS IMPROVEMENT
setTerrainGrid 50;

// ------CONFIRM OPPOSITION-----

if (isServer) then {
     EastHQ = createCenter east;
     WestHQ = createCenter west;

     EAST setFriend [WEST, 0];
     WEST setFriend [EAST, 0];
};

// -----EXECUTE BRIEFING.SQF
execVM "briefing.sqf";

// -----TURN OFF AI CHATTER
enableSentences false;

// -----BEGIN SCRIPT LAUNCHER
[] execVM "001-script-launcher.sqf";

// -----ACM MODULE - RANDOM COMBATANTS

waitUntil {!isNil {ACM01 getVariable "initDone"}};
waitUntil {ACM01 getVariable "initDone"};

[1, ACM01] call BIS_ACM_setIntensityFunc;
[ACM01, 400, 1000] call BIS_ACM_setSpawnDistanceFunc;
[["USMC","RU","INS","CDF","GER"], ACM01] call BIS_ACM_setFactionsFunc;
[0, 0.4, BIS_ACM] call BIS_ACM_setSkillFunc;
[0.2, 0.5, BIS_ACM] call BIS_ACM_setAmmoFunc;
["ground_patrol", 1, ACM01] call BIS_ACM_setTypeChanceFunc;
["air_patrol", 1, ACM01] call BIS_ACM_setTypeChanceFunc;
The first code (waitUntil {!isNil "bis_fnc_init"};) tells the init.sqf file to wait until the 'Functions' module is initialized before proceeding. You should make a habit of placing a 'Functions' module on the map of every mission you create, as it is used by a wide variety of addons/mods that you may utilize.
The second code (setTerrainGrid 50;) can be removed completely if you would like grass on your map. The number could also be lowered to twenty-five (standard setting) for a full display of grass.
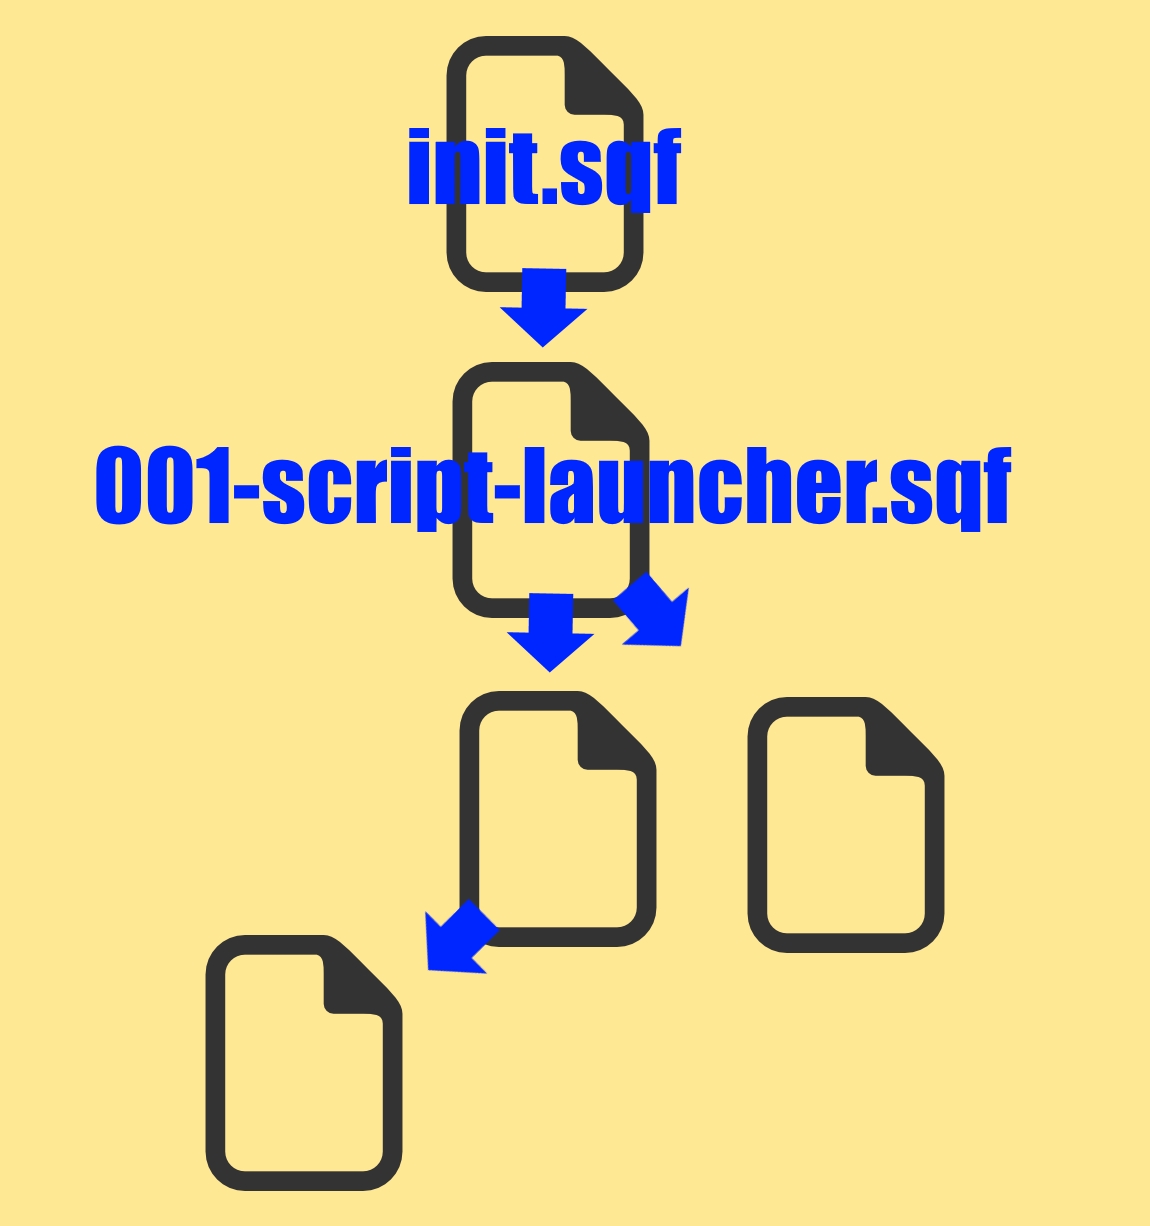 Some of the code is self-explanatory, so we will skip ahead to [] execVM "001-script-launcher.sqf";. When this script is activated by the init.sqf file it will start a chain reaction of other script activations. These in turn will activate other scripts, which then activate other scripts ad infinitum (see image on right).
All of these scripts will run simultaneously with some events delayed via the use of the sleep code (EX: sleep 10; sleep 600; sleep 3600; etc). This domino effect has the advantage of setting several events in motion and allows for more sophisticated mission construction.
An example would be a 001-script-launcher.sqf that activates a day/night cycle timer script, turns on some mood music and then activates the first attack wave. Again, these could also have sleep delays on them so that the events are staggered.
The final block of code references the 'Ambient Combat' module. This module will create random combat situations during your mission. To make this work, place the module on the map and then synchronize it to each of the players. Name the module 'ACM01', which will then link it to the code in your init.sqf file.
Really the only code that you need to modify is in this line: [1, ACM01] call BIS_ACM_setIntensityFunc;. the '1' means the attack intensity is set to full. You can lower this by making the number 0.5 or less.
The briefing.sqf file
This file is contains the mission diary record and all the tasks you create for the players. I have written quite an extensive article on using this file in my tutorial Adding Mission Tasks.
The description.ext file
This file sets up the basic parameters of your mission plus references your music and sound files. Occasionally an addon will require you to add some additional code to this file but, all in all, it is pretty straightforward. Your music and sound files need to placed in their respective folders and in regard to line 83 (loadScreen = "pictures\splash.paa";) you can learn how to make your own image by reading my tutorial Creating a Mission Intro Splash Screen.
class Header
{
 gameType = COOP;            // values: DM, CTF, FF, Coop, Team, Scont, Hold, Unknown
 minPlayers = 2;             //min # of players the mission supports
 maxPlayers = 4;            //Max # of players the mission supports
 playerCountMultipleOf = 1;
};

class CfgSounds
{
	// List of sounds (.ogg files without the .ogg extension)
	sounds[] = {ambientbattle,buttonclick,notification};

        class ambientbattle
	{
		name = "ambientbattle"; // Name for mission editor
		sound[] = {\sound\ambientbattle.ogg, db+10, 1.0};
		titles[] = {0, ""};
	};

        class buttonclick
	{
		name = "buttonclick"; // Name for mission editor
		sound[] = {\sound\buttonclick.ogg, db+10, 1.0};
		titles[] = {0, ""};
	};

        class notification
	{
		name = "notification"; // Name for mission editor
		sound[] = {\sound\notification.ogg, db+10, 1.0};
		titles[] = {0, ""};
	};

};


class CfgMusic
{
	tracks[]={arrival,coltanblues,dancingscimitar};

	class arrival
	{
		name = "arrival";
		sound[] = {"\music\arrival.ogg", db+10, 1.0};
	};

        class coltanblues
	{
		name = "coltanblues";
		sound[] = {"\music\coltanblues.ogg", db+10, 1.0};
	};

        class dancingscimitar
	{
		name = "dancingscimitar";
		sound[] = {"\music\dancingscimitar.ogg", db+10, 1.0};
	};

};


/* Respawn Values:
 * 0 / NONE = No respawn
 * 1 / BIRD = Respawn as seagull
 * 2 / INSTANT = Respawn where you just died
 * 3 / BASE = Respawn in base (markername should be "respawn_west" (_west/_east/_guerrila/_civilian)
 * 4 / GROUP = If AI left in group, respawn in that
 * 5 / SIDE =
 */


onLoadMission = "MISSION ORGANIZATION TUTORIAL";

onLoadIntro = "Welcome to the tutorial!";

onLoadMissionTime = false;

onLoadIntroTime = false;

loadScreen =  "pictures\splash.paa";

showCompass=1;
showRadio=1;
showGPS=1;
showMap=1;
showNotepad=1;
showWatch=1;
debriefing=1;
showHUD = 1;

respawn = 3;
respawndelay = 10;
disabledAI = 0;
respawnDialog = 1;
The map-destruction.sqf file
 This file is used to destroy unwanted objects on a map. The primary targets are buildings, fences, trees and lampposts. It will have some effect on bridges (they do not collapse completely) and little or no effect on roads.
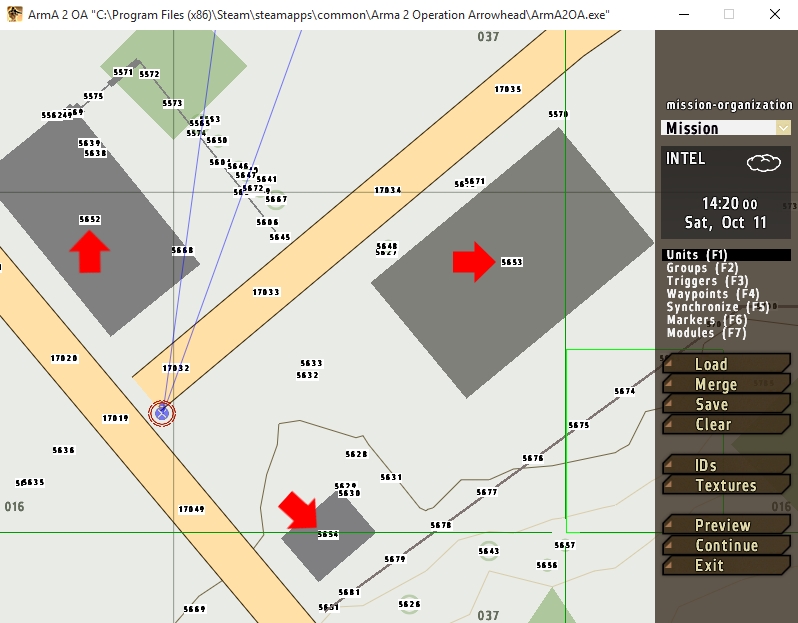
The image to the left is a screenshot of the article demo mission opened in the ArmA 2 Mission Editor and shows all the ID numbers of objects in the area.
Click the 'IDs' button found on the right sidebar to reveal all of the map ID numbers. The three buildings surrounding the player spawn point (ID's 5652, 5653 and 5654) have been added to the map-destruction.sqf file.
Upon mission launch, the three buildings will collapse to the ground, leaving a pile of rubble and a lingering dust cloud that may take a couple of minutes to dissipate. It is important to be aware of this, as clearing anything from an area will always leave some residual debris; however, if planned correctly, the debris can be built over quite successfully, hiding any remnants of the previous destruction.
//-----CLICK THE 'IDs' BUTTON TO SEE MAP OBJECT IDS. FIND THE ID OF THE OBJECT YOU WOULD LIKE TO DESTROY
//----- AND PLACE IT IN A NEW LINE.  EX:  BUILDING 01'S ID = 5652.

//BUILDING 01
((position destructor01) nearestObject 5652) setDamage 1;

//BUILDING 02
((position destructor01) nearestObject 5653) setDamage 1;

//BUILDING 03
((position destructor01) nearestObject 5654) setDamage 1;
Folder: addon-scripts
Any scripts that you develop or download from a third-party that provide a specific function outside the realm of core game features can be placed in this folder. In the demo mission I have placed a teleport script in the folder which is linked to a teleporter on the map. When the teleporter is clicked it will call the script which, in turn, will teleport the player to the designated marker. Viewing the 'Initialization' field of the teleporter sign will reveal how it all works. If you wish, you can make multiple teleporters by simply copy & pasting and then renaming each of the teleporters and markers.
Folder: construction
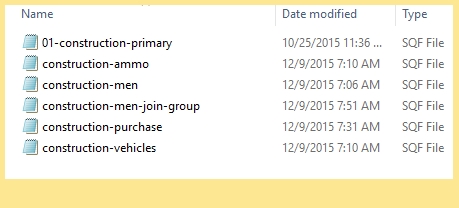 This folder is used for any construction related materials which includes fortifications, vehicles, ammo and men. There are six construction scripts provided for you in the demo mission's construction folder.
The script titled 'construction-purchase' is directly related to the 'Construction Interface' module. It is fully operational in the demo mission and can be accessed simply by scrolling your mousewheel. For more information on this module read my tutorial How to Use the Construction Interface.
The other five scripts are linked to the four construction signs you will see when you open the mission in the editor. Using the 'addaction' command to call the scripts, you have the ability to spawn a variety of vehicles, ammo crates and Blufor soldiers. All of these scripts can be modified to your liking.
Folder: effects
You can house any special effect scripts here. This would mainly pertain to particle effects seen in battles and produced by epic explosions. You will find two highly useful smoke effect scripts in the folder. These will need to be activated through a trigger or another script.
To demonstrate how this works, I have place the following code in the demo mission's '001-script-launcher' file:
[] execVM "effects\smoke-tall-plume-01.sqf";
[] execVM "effects\smoke-round-01.sqf";
I then placed two markers on the road west of the spawn location named 'marker-smoke-01' and 'marker-smoke-02' respectively. I added these marker locations to the smoke scripts and then selected the objects from which I would like the smoke to emanate. For the tall plume of smoke I chose a large pile of rubble and for the round smoke I used a baseball. You can use any object as long as you have the class ID available.
If you would like to kill the smoke after a set amount of time, you can place this code in your '001-script-launcher' file:
sleep 600;
deletevehicle smokesource01;
deletevehicle smokesource02;
Or this:
sleep 600;
{deleteVehicle _x} foreach [smokesource01,smokesource02];
//MODIFY MARKER NAME AND THEN RUN THIS CODE IN A TRIGGER:
//null = [this] execVM "effects\smoke-tall-plume-01.sqf";

smokesource01 = "Land_ruin_rubble" createVehicle (getMarkerPos "marker-smoke-01");
[smokesource01, [0.1,0.1,0.1]] spawn {
	_sh=_this select 0;
	_col=_this select 1;
	_c1=_col select 0;
	_c2=_col select 1;
	_c3=_col select 2;

	sleep (3+random 1);

	_source = "#particlesource" createVehicleLocal getpos _sh;
	_source setParticleParams [["\Ca\Data\ParticleEffects\Universal\Universal.p3d", 16, 7, 48], "", "Billboard", 1, 20, [0, 0, 0], [0.2, 0.1, 0.1], 0, 1.277, 1, 0.025, [0.1, 2, 6], [[_c1, _c2, _c3, 0.2], [_c1, _c2, _c3, 0.05], [_c1, _c2, _c3, 0]], [1.5,0.5], 1, 0.04, "", "", _sh];
	_source setParticleRandom [2, [0, 0, 0], [0.25, 0.25, 0.25], 0, 0.5, [0, 0, 0, 0.1], 0, 0, 10];
	_source setDropInterval 0.03;
	_source2 = "#particlesource" createVehicleLocal getpos _sh;
	_source2 setParticleParams [["\Ca\Data\ParticleEffects\Universal\Universal.p3d", 16, 12, 8, 0], "", "Billboard", 1, 20, [0, 0, 0], [0.2, 0.1, 0.1], 0, 1.277, 1, 0.025, [0.1, 2, 6], [[_c1, _c2, _c3, 1], [_c1, _c2, _c3, 0.5], [_c1, _c2, _c3, 0]], [0.2], 1, 0.04, "", "", _sh];
	_source2 setParticleRandom [2, [0, 0, 0], [0.25, 0.25, 0.25], 0, 0.5, [0, 0, 0, 0.2], 0, 0, 360];
	_source2 setDropInterval 0.03;
        _source3 = "#particlesource" createVehicleLocal getpos _sh;
	_source3 setParticleParams [["\Ca\Data\ParticleEffects\Universal\Universal.p3d", 16, 7, 48], "", "Billboard", 1, 8, [0, 0, 0], [0, 0, 1.5], 0, 10, 7.9, 0.066, [1, 3, 6], [[0.1, 0.1, 0.1, 1], [0.25, 0.25, 0.25, 0.5], [0.5, 0.5, 0.5, 0]], [0.125], 1, 0, "", "", _sh];
	_source3 setParticleRandom [0, [0.25, 0.25, 0], [0.2, 0.2, 0], 0, 0.25, [0, 0, 0, 0.1], 0, 0];
	_source3 setDropInterval 0.05;
};
Folder: loadouts
A loadout consists of the weapons and equipment provided to a player or AI at the beginning of a mission. One sample loadout has been added to the demo mission that you can utilize. If you look in the player 'Initialization' field you will see the code used to call the script, which is activated when you spawn. There is also some additional code that ensures the loadout will reactivate upon respawn.
I have written an extensive article entitled Loadout Codes for Units which elaborates on the finer points of this subject. You are welcome to reference it as you go about creating your own loadouts.
Folder: music
All music files are placed here. They must be in .ogg format or they will not work. You can use Audacity to convert your music to the proper format. I have additional information on using triggers to activate music on my Code Design Potpourri page.
Folder: pictures
All image files belong in this folder. The only format recognized by ArmA 2 is .paa. You can convert your images using Bohemian Interactive's TexView2 which can be obtained by downloading and installing BI Tools 2.5. This software works best when the original image is a .png.
To place an image texture on an in-game object, use the following code:
this setObjectTexture [0,"pictures\NAME-OF-IMAGE.paa"];
To change out a flag texture apply this code:
this setFlagTexture "pictures\NAME-OF-IMAGE.paa";
You can learn how to make your own splash picture by reading my article Creating a Mission Intro Splash Screen.
Folder: sound
All sound files are placed here. Just like the music files, sound files must be in .ogg format or you will not hear them. Enter the mission and just past the smoke demo is a tiny cargo container that has been turned into a soundbox. Scroll over the container, select each of the three sound samples and they will play. The sound scripts are found alongside the sound files in the sound folder.
Folder: spawns
You will find that as you develop your mission several spawn scripts will be made and keeping them organized is crucial. There are two sample spawn scripts in the demo mission's 'spawn' folder. The one titled 'spawn-men-blufor-join-group' is used in conjunction with the scripts found in the 'construction' folder.
The second one ('spawn-civilians-on-for-loop.sqf') has been activated in the '001-script-launcher.sqf' file which, as we have previously discussed, has itself been activated by the 'init.sqf' file at mission launch.
The civilian spawn marker is positioned northwest of the tiny cargo container sound box. This marker is linked to the launch code in '001-script-launcher.sqf', telling it where to place the civilians.
'spawn-civilians-on-for-loop.sqf' runs on a for loop, which means that after the script has been executed it will loop around and run again and again. I have set the script to loop ten times. There is a thirty second delay after the civilians spawn, at which time they will be deleted. After thirty seconds they will spawn again and the cycle continues until the predetermined number of loops has run its course.
You can read more about for loops in my article Spawning with For Loops.
Folder: tasks
This folder holds all scripts related to mission tasks. One task has been provided to you in the demo mission: BLOW UP BUILDING. You can accomplish this by scrolling over the small cargo container located next to the barracks building and clicking the text "Detonate Bomb!"
This will activate the script titled 'task-01.sqf' found in the tasks folder. Once activated, a series of events will unfold that create the actual explosion and aftermath. The 'buttonclick' sound will play, an indicator that the bomb has been activated. This is followed by a hint that confirms the bomb will explode in twenty seconds. After a short delay the cargo container will explode, the building will collapse and smoke & fire will appear.
The tail-end of the script marks the task successfully completed and the marker (marker-task-01) color is changed from red to blue. The script finale is deleting the smoke and fire after 900 seconds.
sleep 01;

playSound "buttonclick";

sleep 01;

hint "THE BOMB HAS BEEN DETONATED! YOU HAVE TWENTY SECONDS TO EVACUATE THE AREA!";

sleep 20;

//CARGO CONTAINER EXPLODES
bomb = "Bo_GBU12_LGB" createVehicle getPos bomb01;

sleep 01;

//TARGET BUILDING COLLAPSES
((position destructor01) nearestObject 5511) setDamage 1;

//NEARBY TREE FALLS
((position destructor01) nearestObject 5418) setDamage 1;

//DESTROY CARGO CONTAINER AND ORANGE ARROW
deletevehicle bomb01;
deletevehicle arrow01;

//FLIP BUS ON ITS SIDE
{ _x setVectorup [0,90,0.1]} foreach [bus01];

//CREATE BUILDING RUBBLE
buildingrubble01 = "CraterLong" createVehicle (getMarkerPos "marker-task-01");

//SMOKE BEGINS
buildingsmoke01 = "Land_ruin_rubble" createVehicle (getMarkerPos "marker-task-01");
[buildingsmoke01, [0.1,0.1,0.1]] spawn {
	_sh=_this select 0;
	_col=_this select 1;
	_c1=_col select 0;
	_c2=_col select 1;
	_c3=_col select 2;

	sleep (3+random 1);

	_source = "#particlesource" createVehicleLocal getpos _sh;
	_source setParticleParams [["\Ca\Data\ParticleEffects\Universal\Universal", 16, 7, 48], "", "Billboard", 1, 20, [0, 0, 0], [0.2, 0.1, 0.1], 0, 1.277, 1, 0.025, [0.1, 2, 6], [[_c1, _c2, _c3, 0.2], [_c1, _c2, _c3, 0.05], [_c1, _c2, _c3, 0]], [1.5,0.5], 1, 0.04, "", "", _sh];
	_source setParticleRandom [2, [0, 0, 0], [0.25, 0.25, 0.25], 0, 0.5, [0, 0, 0, 0.1], 0, 0, 10];
	_source setDropInterval 0.03;
	_source2 = "#particlesource" createVehicleLocal getpos _sh;
	_source2 setParticleParams [["\Ca\Data\ParticleEffects\Universal\Universal", 16, 12, 8, 0], "", "Billboard", 1, 20, [0, 0, 0], [0.2, 0.1, 0.1], 0, 1.277, 1, 0.025, [0.1, 2, 6], [[_c1, _c2, _c3, 1], [_c1, _c2, _c3, 0.5], [_c1, _c2, _c3, 0]], [0.2], 1, 0.04, "", "", _sh];
	_source2 setParticleRandom [2, [0, 0, 0], [0.25, 0.25, 0.25], 0, 0.5, [0, 0, 0, 0.2], 0, 0, 360];
	_source2 setDropInterval 0.03;
};

//FIRE BEGINS
{ _x enablesimulation true;_x hideobject false} foreach [buildingfire01];


tskobjective01 setTaskState "SUCCEEDED";
"marker-task-01" setMarkerColorLocal "ColorBlue";

sleep 900;

deletevehicle buildingsmoke01;
deletevehicle buildingfire01;
Folder: timers
This folder holds any scripts that use the sleep code and that run independently of other scripts. Most of the time timer scripts will be initiated by either the 'init.sqf' file or the '001-script-launcher.sqf' file at the beginning of the mission.
The first timer sample script is called 'time-shift.sqf'. Every fifteen to thirty minutes it will abruptly move the clock ahead and then a text alert will pop up informing the player of the new time. Here is the script:
setDate [2016, 06, 01, 12, 00];

sleep 1800;


setDate [2016, 06, 01, 17, 30];

["June 01, 2016 17:30 hours", "updated for", name player] call bis_fnc_infoText;

sleep 1800;


setDate [2016, 06, 01, 19, 00];

["June 01, 2016 19:00 hours", "updated for", name player] call bis_fnc_infoText;

sleep 900;


setDate [2016, 06, 01, 22, 00];

["June 01, 2016 22:00 hours", "updated for", name player] call bis_fnc_infoText;

sleep 900;


setDate [2016, 06, 02, 01, 00];

["June 02, 2016 01:00 hours", "updated for", name player] call bis_fnc_infoText;

sleep 900;


setDate [2016, 06, 02, 04, 30];

["June 02, 2016 04:30 hours", "updated for", name player] call bis_fnc_infoText;

sleep 1800;


setDate [2016, 06, 02, 08, 00];

["June 02, 2016 08:00 hours", "updated for", name player] call bis_fnc_infoText;

sleep 1800;


setDate [2016, 06, 02, 12, 00];

["June 02, 2016 12:00 hours", "updated for", name player] call bis_fnc_infoText;
The second script ('personnel-timer.sqf') hides and then unhides several animated units. This is useful for creating a vibrant base or city environment where things are continually changing. In the demo mission you can view these characters who, for demonstration purposes, will pop in and out of the map every fifteen seconds.
The script is on a for loop which is set to cycle one hundred times and staggers three groups of units. This staggering technique works well for other elements also, such as rotating parked cars in an urban area.
//SCRIPT LOOPS ONE HUNDRED TIMES

for "_i" from 0 to 100 do {

sleep 15;

//GROUP ONE NOT VISIBLE
{ _x enablesimulation false;_x hideobject true} foreach [soldier03,soldier04,soldier05,soldier06,soldier07,soldier08,
    soldier09,soldier10,soldier11,soldier12,soldier13,soldier16,soldier18];

//GROUP TWO VISIBLE
{ _x enablesimulation true;_x hideobject false} foreach [injuredsoldier01,medic01,soldier17,soldier01,soldier02,
    soldier19,soldier21,soldier22];

sleep 15;

//GROUP THREE VISIBLE
{ _x enablesimulation true;_x hideobject false} foreach [pow01,pow02,pow03,pow04,pow05,pow06,soldier14,soldier15,
    soldier20,soldier23,soldier24,soldier25,newsman01];

sleep 15;

//GROUP ONE VISIBLE
{ _x enablesimulation true;_x hideobject false} foreach [soldier03,soldier04,soldier05,soldier06,soldier07,soldier08,
    soldier09,soldier10,soldier11,soldier12,soldier13,soldier16,soldier18];

//GROUP TWO NOT VISIBLE
{ _x enablesimulation false;_x hideobject true} foreach [injuredsoldier01,medic01,soldier17,soldier01,soldier02,
    soldier19,soldier21,soldier22];

sleep 15;

//GROUP THREE NOT VISIBLE
{ _x enablesimulation false;_x hideobject true} foreach [pow01,pow02,pow03,pow04,pow05,pow06,soldier14,soldier15,
    soldier20,soldier23,soldier24,soldier25,newsman01];

};
Conclusion
You now have a foundation upon which to built very extensive and complex ArmA 2 missions. Feel free to browse through this site for more articles that will provide details on specific aspects of mission building. If you have questions about mission structure or coding you can contact us and we would be happy to assist you.