written by RJ Wattenhofer
This article will teach you how to attach a marker to a player that will then follow the player across the map. It will also provide some sample scripts which will enable you to create enemy groups that spawn and re-spawn at set intervals and then subsequently pursue the player.

Attaching the marker
 After you have created your target player and his/her group members, double-click the player and name him/her 'player01' and then place a marker on the map near the designated unit.
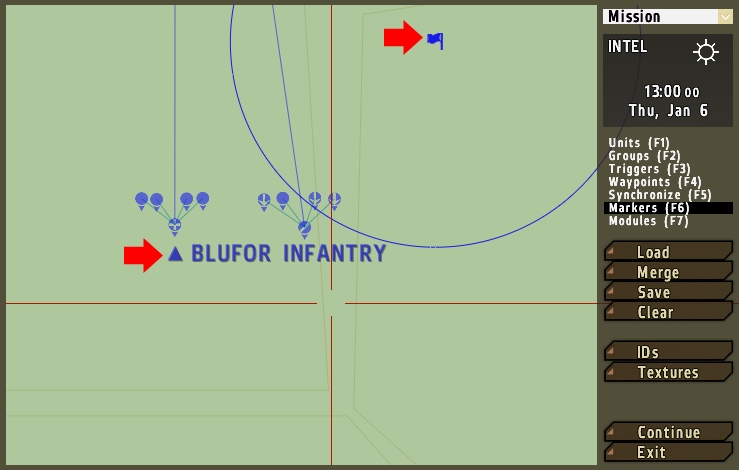
Double-click the marker and name it 'marker-follow-player-01'. You can name the marker anything you want but for purposes of this article we will name it this. Modify the marker color and icon and in the text area type "BLUFOR INFANTRY".
Make a 5x5 (Axis a and Axis b) trigger and name it 'deleteopfor'. Place this code in the 'Condition' field:
this AND (getPosATL (vehicle player) select 2) < 3;
This stipulates that no OPFOR will be deleted unless they are three meters or less above ground level. Put this in the 'On Act' field:
{deleteVehicle _x} forEach thisList;
Set the trigger's activation for OPFOR and click on 'Repeatedly'. Now click 'Countdown' and enter '10' in the 'Mid' 'Mid' and 'Max'. Close the trigger and open your player. Paste this code into its 'Initialization' field:
deleteopfor attachTo[player01,[0,0,0]];
What we have done is attached a trigger to the player that will delete any OPFOR that happen to spawn in the trigger's perimeter. This prepares for the eventuality that the player is standing in one place for an extended duration and will keep enemy troops from spawning directly on top of the player. The ten second delay allows for enemy troops to actually spawn on the marker before it moves away without the danger of being prematurely deleted.
The marker-attached-to-unit.sqf file
Open up 'Notepad' and place the following code in it:
while {true} do
{
"marker-follow-player-01" setmarkerpos (getpos player01);
sleep 3;
};
Save the file as 'marker-attached-to-unit.sqf' and place it into your mission folder. This is a 'while loop' script which runs for infinity, constantly checking the position of the marker and adjusting its position every three seconds. The timing can be modified as you see fit. If you change the names of the marker or player you will need to edit the names in this script.
This file needs to be activated at the beginning of the game*. Open your 'init.sqf' file and enter this code:
// -----EXECUTE UNIT MARKER ATTACHMENT SO ENEMIES FOLLOW
execVM "marker-attached-to-unit.sqf";
Your 'marker-attached-to-unit.sqf' file will activate at the beginning of the game and the marker will now follow the player. Incidentally, if you do not have an init.sqf file, simply open 'Notepad', save a file using this name and drop it into the root of your mission folder.
*This code cannot be placed directly in your 'init.sqf' file as it is a while loop and code entered below it will not be activated due to the looping.
The enemy-trackers-01.sqf file
Now that you have successfully created a marker that follows the player, we need enemy troops that follow the marker and, in essence, track your player and give him a hard time.
Create a new folder named 'spawns' in your mission directory. Copy the following code, paste into an empty file and save it as 'enemy-trackers-01.sqf'. Drop this new file into the 'spawns' folder. The path to this script should be [MISSION NAME] > spawns > enemy-trackers-01.sqf.
// -----SPAWNS AN OPFOR GROUP ON THE MARKER ATTACHED TO BLUFOR TEAM LEADER WHICH THEN FOLLOWS PLAYER.

_group1 = createGroup EAST;
"RU_Commander" createUnit [getMarkerPos "marker-follow-player-01",_group1,"this allowFleeing 0",random 1, "captain"];
"RU_Soldier_Officer" createUnit [getMarkerPos "marker-follow-player-01",_group1,"this allowFleeing 0",random 1, "lieutenant"];
"RU_Soldier_Medic" createUnit [getMarkerPos "marker-follow-player-01",_group1,"this allowFleeing 0",random 1, "corporal"];
"RU_Soldier" createUnit [getMarkerPos "marker-follow-player-01",_group1,"this allowFleeing 0",random 1, "private"];
"RU_Soldier" createUnit [getMarkerPos "marker-follow-player-01",_group1,"this allowFleeing 0",random 1, "private"];
"RU_Soldier" createUnit [getMarkerPos "marker-follow-player-01",_group1,"this allowFleeing 0",random 1, "private"];
"RU_Soldier" createUnit [getMarkerPos "marker-follow-player-01",_group1,"this allowFleeing 0",random 1, "private"];
"RU_Soldier" createUnit [getMarkerPos "marker-follow-player-01",_group1,"this allowFleeing 0",random 1, "private"];
"RU_Soldier" createUnit [getMarkerPos "marker-follow-player-01",_group1,"this allowFleeing 0",random 1, "private"];
"RU_Soldier" createUnit [getMarkerPos "marker-follow-player-01",_group1,"this allowFleeing 0",random 1, "private"];
[_group1, getMarkerPos "marker-follow-player-01", 600 ] call bis_fnc_taskAttack;
[_group1, 1] setWaypointSpeed "FULL";
[_group1, 1] setWaypointCombatMode "RED";
[_group1, 1] setWaypointBehaviour "AWARE";

{_x setSkill ["aimingAccuracy",0.06]} foreach units _group1;
{_x setSkill ["aimingShake",0.6]} foreach units _group1;
{_x setSkill ["aimingSpeed",0.6]} foreach units _group1;
{_x setSkill ["endurance",0.6]} foreach units _group1;
{_x setSkill ["spotDistance",1]} foreach units _group1;
{_x setSkill ["spotTime",1]} foreach units _group1;
{_x setSkill ["courage",0.6]} foreach units _group1;
{_x setSkill ["reloadSpeed",0.6]} foreach units _group1;
{_x setSkill ["commanding",0.6]} foreach units _group1;
{_x setSkill ["general",0.6]} foreach units _group1;

{_x setVehicleInit "0 = [this, 50, true, 600] execvm 'loadouts\loadout-enemy-01.sqf'";} foreach units _group1;

{ _x enablesimulation false;_x hideobject true} foreach units _group1;

sleep 15;

{ _x enablesimulation true;_x hideobject false} foreach units _group1;


sleep 600;

{deleteVehicle _x} foreach units _group1;
processInitCommands;
You can see in the script that the marker name 'marker-follow-player-01' is referenced by each individual soldier and that on line sixteen it designates this marker as the target.
Line thirty-two adds a custom weapon loadout for the troops. You can read 'ArmA 2 | Loadout Codes for Units' for more detailed instructions on creating loadouts, including using a loadout.sqf file.
Line thirty-four makes sure that the units spawn invisible. They will then appear after fifteen seconds. This will allow time for the player to move across the map and away from the enemy troops before they appear. In the event that the player does not move then our previously created trigger will delete all the spawned units while they are still invisible.
Finally, after ten minutes the troops will be deleted from the map, regardless if they engage with the player or not. Deleting the units minimizes lag and allows for new enemy units to spawn without little or no overlap from the previous group.
The tracker-timer.sqf file
It is time to create a file that places our enemy-trackers-01.sqf file into a loop, guaranteeing they will continually spawn throughout the mission.
Make a folder called 'timers' in your mission folder. Copy the code below and save it in a file titled 'tracker-timer.sqf'. Move this script into the 'timers' folder. The filepath should be [MISSION NAME] > timers > tracker-timer.sqf.
//SCRIPT LOOPS THIRTY TIMES - TRACKERS

for "_i" from 0 to 30 do {

// -----BEGIN ENEMY TRACKERS 01 - SPAWN ON ATTACHED MARKER - FOLLOW BLUFOR INFANTRY
[] execVM "spawns\enemy-trackers-01.sqf";

sleep 600;

// -----BEGIN ENEMY TRACKERS - SPAWN ON ATTACHED MARKER - FOLLOW BLUFOR INFANTRY
[] execVM "spawns\enemy-trackers-02.sqf";

sleep 600;

};
You will notice that there are two entries in the script: 'enemy-trackers-01.sqf' and 'enemy-trackers-02.sqf'. You can create a duplicate of the first script, modify it and then enter it into the 'tracker-timer.sqf' so that those troops are also spawned. This alteration mixes up the sequence a bit and adds to more interesting gameplay.
Open up your 'init.sqf' file once again and enter this code into it, which will activate the tracker-timer.sqf file at the start of the game:
// -----EXECUTE TRACKER TIMER
execVM "tracker-timer.sqf";
The helicopter-tracker-01.sqf file
This helicopter spawn script creates its own loop and can run independently of the 'tracker-timer.sqf' file.
// -----SPAWNS AN OPFOR MI17 WITH ROCKETS ON THE MARKER ATTACHED TO BLUFOR TEAM LEADER WHICH THEN FOLLOWS PLAYER.

private["_delay"];

MI1701SPAWN_Pos=[(getmarkerpos "marker-follow-player-01") select 0,(getmarkerpos "marker-follow-player-01") select 1,((getmarkerpos "marker-follow-player-01")select 2)+30];

waituntil {!isNil "bis_fnc_init"};

_delay=20;

GroupAIR01 = createGroup east;
MI1701Count= 0;
MI1701= objNull;

while{MI1701Count < 15}do{ // Change '15' to how many times you want the vehicle to respawn
if(isServer)then{
if(!alive MI1701)then{
sleep _delay; // seconds to delay the deletion after vehicle is killed
{deletevehicle _x}foreach crew vehicle MI1701; // deletes all members of the vehicle crew
deletevehicle MI1701;
MI1701= ([MI1701SPAWN_Pos, 0, "Mi17_rockets_RU", GroupAIR01] call BIS_fnc_spawnVehicle) select 0;
MI1701 setVehicleVarName "MI1701";
wp1= GroupAIR01 addWaypoint [(getmarkerpos "marker-follow-player-01"), 0];
wp1 setWaypointSpeed "FULL";
wp1 setWaypointType "SAD";
MI1701Count= MI1701Count+1;

publicvariable "MI1701Count";
publicvariable "MI1701";
};
};

sleep 1500; // delay to save system performance and give pause to the next spawn;
};

sleep 1;
Things to note in this script are the starting spawn height, the loop number and the delay between loops. You will find the height at the end of line six. Currently it is set to thirty, which is just above the treeline. The lower you are able to place the helicopter without it crashing the better, as it will spot the player much easier.
Line sixteen can be modified to set the number of script loops (right now it is fifteen). Line thirty-four is coded for the script to sleep 1,500 seconds (twenty-five minutes) between re-spawns.
Once again, we must add code into the 'init.sqf' file so that the helicopter script is activated:
// -----EXECUTE TRACKER TIMER
execVM "helicopter-tracker-01.sqf";
You have completed the setup and now have a mission that will continually bombard your players with enemy units and helicopters. Enjoy!